At the suggestion of a couple of Velo Orange blog readers I made a few leather chainstay protectors. They are self adhesive peel and stick. So far I have one on my Kogswell and on my Motobecane city bike.
Right now we have a few in chocolate brown; honey and black versions will be ready early next week.
These really are so much classier than those fake carbon fiber stickers or thick packing tape you see on some bikes. $8 in the Velo Orange Store.
27 April, 2006
Leather Chainstay Protectors

The Velo Orange Web Store is Open
Right now it only works with paypal credit card acceptance. We'll have the regular credit card system set up in a few weeks. Also please let me know if you find any bugs.
Technical Bulletins, Racks, etc

Two small issues we've had questions about:
1) On some of the brass bells the little aluminum spacer stays stuck on the mount when the mount is unscrewed. A sharp tug will remove it, allowing you to put it back on the bell's stem before screwing the bell into a Velo Orange spacer mount.
2) Yes, by all means feed your mudflap some Brooks Proofhide, Snow Seal, leather oil, or whatever leather treatment you have handy. Re-apply it a couple of times each year to keep your mud flap happy and healthy.
In other developments:
The decaleurs are in production and I've been told they will be finished in less than 2 weeks. The price will be $48 for all who reserved them. But the manufacturing cost is higher than we estimated so the long term price will be $52.
300 bells in both brass and aluminum are being made for us by those dedicated Japanese bell-smiths. They will be here in a few weeks.
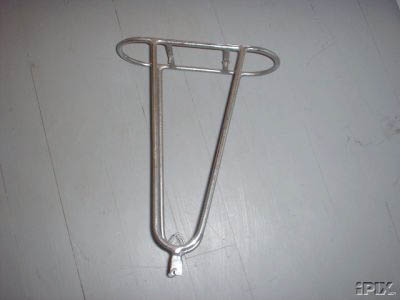
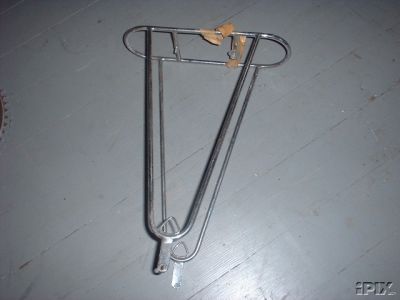
I'll take a crack at making a prototype of both a front and a rear rack. They will be of a minimalist design and heavily influenced by Rene Herse's racks. They will have adjustments, but look like custom racks The customer will be expected to drill the holes in the mounting tangs so the fit really will be custom. If things go well, both 700C and 650B versions will be available this summer. Here is a link to a photo of a Herse rack and here is one from Singer.
21 April, 2006
Decaleur du Sac, part 2

I've gotten a lot of e-mails about the decaleurs and it has been a painful development process. But the production version of the Velo Orange decaleur du sac, or handlebar bag holder is just about ready. A few very minor changes and we go into production next week.
I am very pleased with the quality. The shop making them is the best in the area. All parts are 304 stainless steel and the welding is first rate.
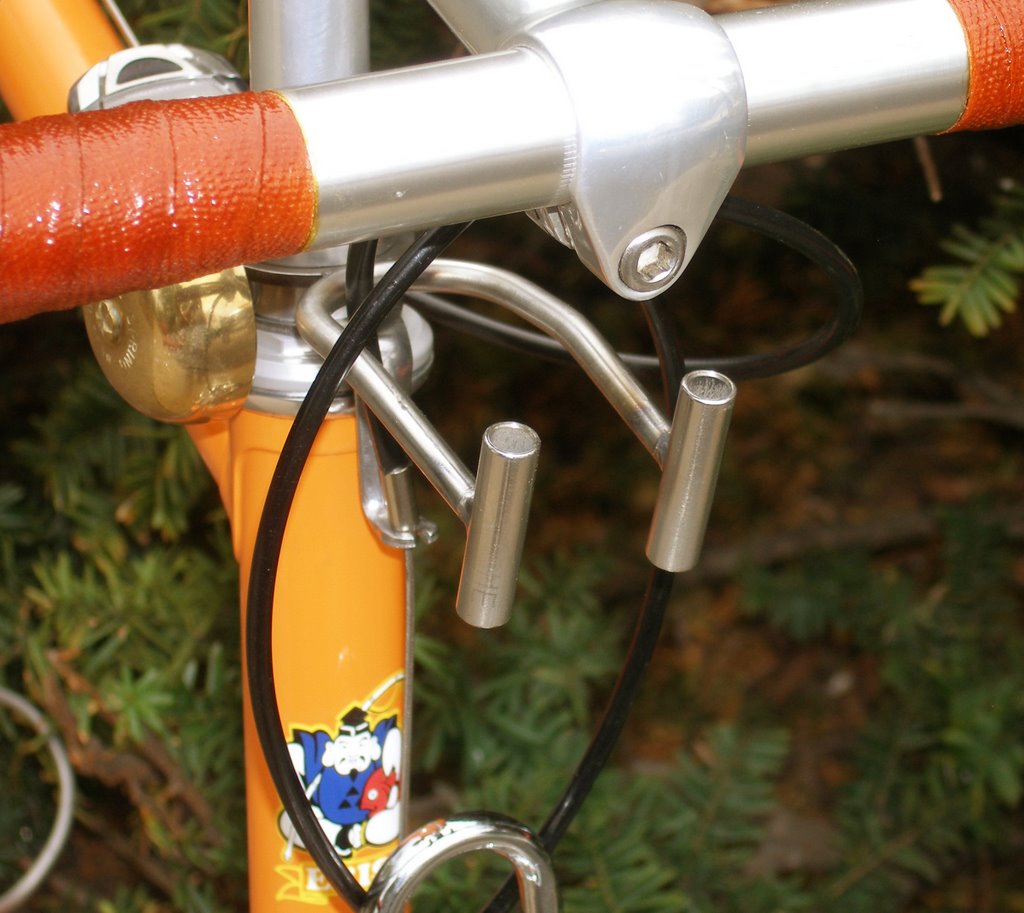
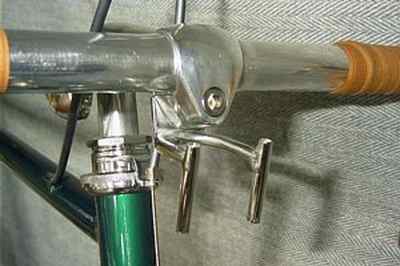
The decaleur consists of two parts. There is the part that fits on the bag, as shown in the second photo; these will fit any bag. The part that goes on the bike is available in two main versions.

The first is the traditional constructeur type shown at the top of the first photo and also on my Motobecane. It can be ordered in a long drop or short drop version (the long drop is shown). The drop is simply the bag's distance below the handlebar and we've not yet settled on the exact distances that would be best.
The second version is welded to a 3 mm (1/8") stainless steel spacer and mounts on the headset stack. It is available in a 1" version and a 1-1/8" version.
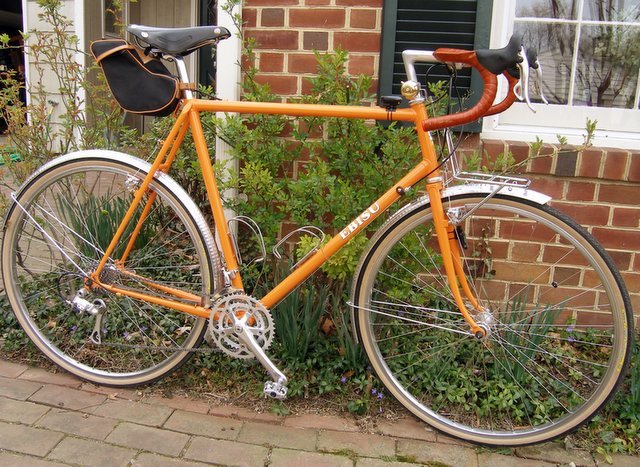
Like the first version it can be bent to fine-tune the height and ensure your bag rests on your front rack. I have done this on my Ebisu as shown in the last two photos. The U-shaped part
 is solid rod, not tube, so it can be safely bent.
The first production run will be very small and I suggest that if you want one, you reserve your's soon. No deposit is require.
The price has yet to be determined. My best guess now is between $40 and $50 for the complete unit. I'll know the exact cost next week when the welder and machinist give me their final numbers based on the couple of very minor changes we'll make.Separate bike and bag mounts will also be available should you want to switch a bag between bikes. Delivery should be in two to three weeks.
On a related note. The Velo Orange E-store will be operational sometime next week. Thanks for all the suggestions, encouragement, and orders.

17 April, 2006
Look what the Easter Bunny brought
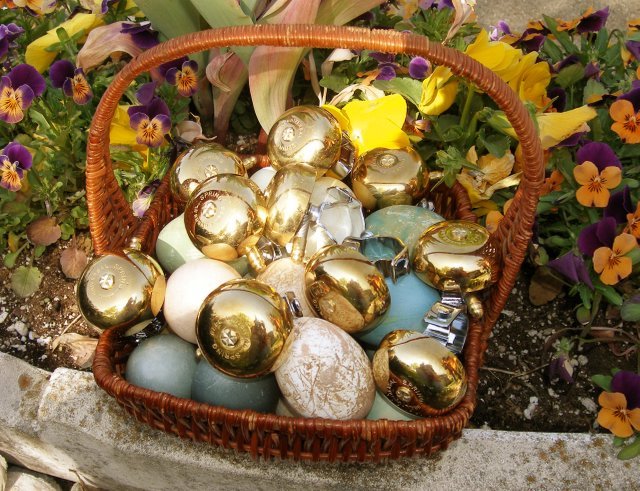

We'll be shipping brass bells tomorrow, ding ding! $9 each.
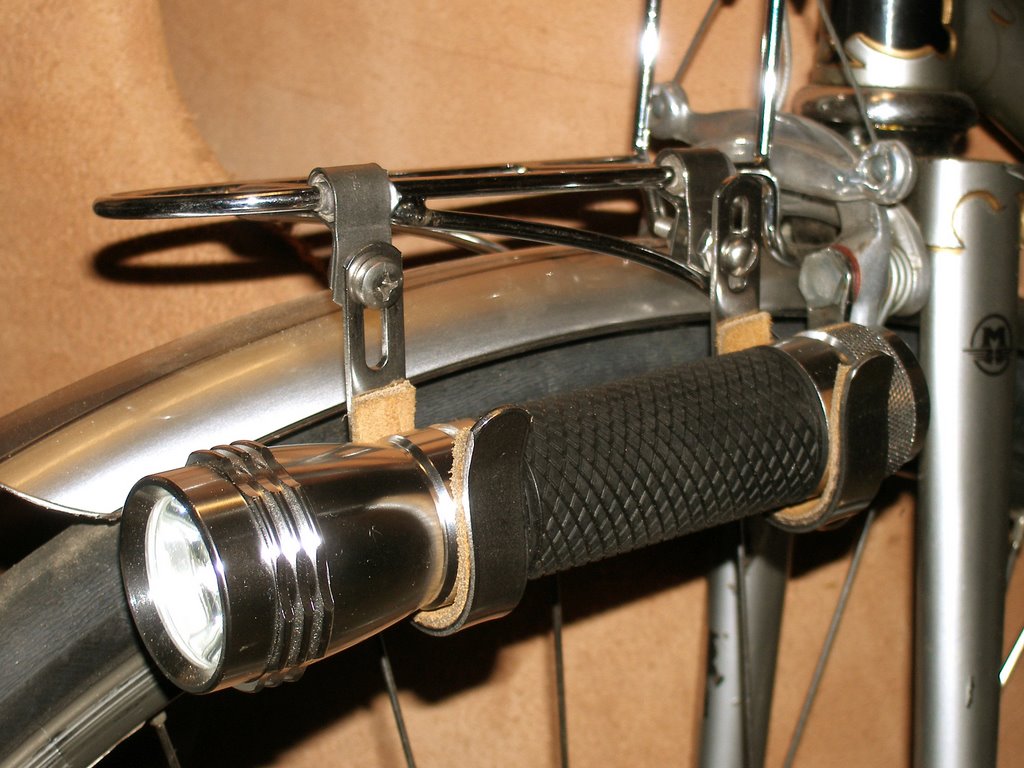
And the flashlight brackets arrived ahead of schedule. They are thick electro-polished 304 stainless made for us by a well known manufacturer of yachting hardware. $12 in C or AA size. Please read my post about why flashlight mounts are so practical.
The photo on the lower below shows the flashlight bracket on a TA/Mafac rack.

15 April, 2006
Shellac, Honey Toe Clip Leathers, and Mudflaps

 We have three new products. The fender mud flaps are made of almost 1/4"-thick saddle-maker's leather and come with mounting hardware. They are about 6-1/2" long and about 4-1/2" wide. But, best of all, they don't cost $35 (like some leather mud flaps); they cost $9.75.
We now have our toe clip leathers in thick honey-colored suede, in black, and in lipstick red neubuck . No, I'm not kidding; I found a side of upholstery leather that's black on one side and bright red on the reverse. $5.
And we have shellac kits that include enough de-waxed blond, orange, or garnet flakes to do a bike's worth of handlebars with enough left over for touch-ups. A brush and instructions are also included. $6.50.
Click on the photos to enlarge. Shipping is still $2 for any order. And I'm off on a bike ride.

13 April, 2006
What We Have

It's spring and products keep popping up like flowers. Until we get the E-store up, and I am working on it, I'll keep taking orders via paypal and check, but it's getting a little confusing and I've gotten a lot of e-mails asking if we have certain items. So here is a list of what we have in stock, or soon will, with prices. By the way my ordering system is still crude,so if you don't get something in a week or so, please e-mail and I'll make sure it went out.
Bell mounts: 1" silver: $5 - in stock
Bell mounts: 1-1/8" silver: - $5 in stock
Bell mounts: 1-1/8" black: - $5 in stock
Brass bells: $9 - sold out, but more being ordered
Toe clip leathers, brown: $5 - in stock
Toe clip leathers, black and red: $5 - in stock (black on one side, red neubuck on reverse)
Toe clip leathers, honey suede: $5 - in stock
Blond shellac flakes: $6.50 - in stock (includes brush and instruction)
Orange shellac flakes: $6.50 - in stock (includes brush and instruction)
Garnet shellac flakes: $6.50 - in stock (includes brush and instruction)
Simichrome polish: $8.50 - in stock
Flashlight bracket C: $12 - in stock
Flashlight bracket AA: $12 - in stock
Mud flaps $9.75 - in stock
Leather chain guards: $?? - next week
Decaleurs, traditional: $39 - in two weeks, I hope
Decaleurs, 1" spacer mount: $39 - in two weeks, with luck
Decaleurs, 1-1/8": $39 - in two weeks, god willing
Leather bar wrap, brown: $25 (or so) - ask me next week
Sewn leather bar covers, brown: $25 (or so) - ask me next week
TA style bags: ????
Doily seat covers: by commision only ;<)
Shipping is still $2 for any order. I'll update this page as stuff arrives or sells out.
Bike Candy?
 We each have ideas about customizing our bikes. My wife, is an avid and very skilled knitter. She makes fisherman's sweaters, felted handbags and such. She found this doily seat cover pattern in a knitting magazine and made it last night. This morning it was on her Gitane mixte city bike.
I think this is a joke. Or is this a new Velo Orange product? Feedback is always welcome.
On another note, the Velo Orange flashlight holders will be made next week by an old and respected manufacturer of sailing and yachting hardware. They will be available for C-cell, and AA-cell sizes. The material is 304 electro-polished stainless steel with a soft leather lining. $12.
09 April, 2006
Canals and Tow Paths

Many of us, as we advance in years and add a few kilos, find that riding up mountains no longer holds the allure it once did. A nice flat trail along the water, with plenty of villages and canal-side cafes where one might stop for a glass of wine and un sandwich jambon is more to our liking. And a nice B&B with real down duvets at the end of the day is not unwelcome. Perhaps there will be a patio overlooking the canal where we can sip an after-dinner Calvados and exchange pleasantries with the barge men.
 So we discover the civilized pleasures of canal towpaths. Some wide tires, a handlebar bag to carry our wallet, camera, and jacket, and off we go for the day. Or add a saddle bag with a pair of light trousers and a polo shirt and moccasins, and we're ready for a four-day trip. It may be on the Canal du Midi in the south of France or on the Chesapeake and Ohio Canal in Maryland and West Virginia. There are wonderful towpaths in Germany and New York, in Britain and Denmark, and, of course, Holland has a few as well. But wherever you go, you can be sure your granny ring will stay clean.
More photos here.
07 April, 2006
Simichrome Polish
 I bought some old Dia Compe 980-R brakes on E-bay last week. They were made in 1983 and didn't seem to have been cleaned since. So I poured a glass of wine, sat down in the big leather chair, and started polishing one of them with Simichrome. In about 10 minutes it looked like... Well click on the photo to enlarge it and see for yourself.
The trick is to first use a scrap of very fine sand paper, about 400-grit, to get rid of any deep scratches. Then dap a drop of Simichrome on a piece of soft cotton cloth, like an old t-shirt and start polishing. The cloth should be about 6" x 6". Keep using the same piece over and over because the little Simi-particles build up on it and make polishing even faster with use. It doesn't take long to get an amazing shine.
Simichrome polish is made in Germany and it's not cheap, nor is it easy to find. But it is the best and a little lasts a long time once your cloth is saturated. It does a great job on non-anodized aluminum, chrome, brass, stainless steel, and silver. It also leaves a thin film that protects the metal. I've ordered a small case of 50 gram tubes for those of us who can't get it locally. It's $8.50 a tube and the usual $2 shipping for any quantity.
04 April, 2006
Now Shipping (Updated)
 I wanted to let everyone who ordered a spacer bell mount know that they are all packed and will ship in the morning via first class mail. There are more available in both 1" and 1-1/8" sizes; $5 each. Shipping is $2 for any quantity.
The toe clip leathers will ship Friday. I've decided to offer these at the lower price of $5 for now. Again, shipping is $2 for any quantity.
Thanks for the orders and please e-mail if you'd like any spacers or leathers. The photo is of the Canal du Midi.
UPDATE: All the leathers have shipped, in fact they have been flying out the door so fast that I ran out. I'll have more by next Tuesday. I'm running low on bell mount spacers too, but more are ordered. We'll have black 1-1/8" bell mounts next week for you post-modern types.
03 April, 2006
A Decaleur du Sac for 1-1/8" Forks?
Since the first Velo Orange Decaleur is at the welder's and an initial production run looks pretty certain, I've turned my attention to a decaleur for modern bikes. Those of you with stems for 1-1/8" forks know that none of the traditional decaleurs will work. The same is true with several modern quill stems.
My solution is to weld the U-shaped piece (see the lower left-hand photo at the link above) piece to a stainless steel spacer. This will offer the functionality of a traditional decaleur on modern bikes. I'm still waiting to hear from the shop that will, I hope, CNC the spacers, but I think the idea is sound. As always I welcome any feedback or suggestions.
Also, please note that I've updated the Product Update. And we are starting to think about a dedicated web site for sales.
31 March, 2006
Sometimes You Just Need to Hammer
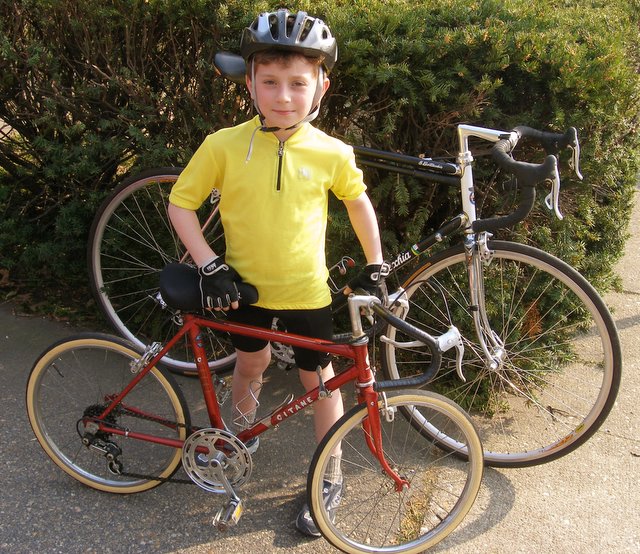
Sometimes you just want to hammer. I mean cyclo-touring is great, but once in a while it feels good to get on a race bike and just go flat out.
I've started training with one of my wife's friends who's preparing for a triathlon, so I got out my racing bike for first time this season. It's a 1989 Bottecchia Record with all Chorus 10-speed stuff (except for theTA Carmina crank). You may remember that Greg Lemond won the '89 Tour de France on a Bottecchia. I love the stiff SPX frame, chrome lugs, and all the overdone decals. My wife says it looks like a pasta box.
Despite the stage race geometry it's a very comfortable bike and it fits me like the proverbial glove. Like most Italian bikes, build quality is only marginal, but boy is the handling dead-spot-on perfection. So despite the fact that I don't often ride it, I doubt I'll ever sell it. There are some more photos here.
Alec got his race bike out too. It's a Gitane with a Simplex 3-speed drivetrain. Photos here.
Today was the first day of the Spring Tour de Murray Hill (that's our neighborhood), so we both rode our race bikes, but I had to stay in 36x25 for the whole stage. I though I had the little guy, but he came around and nipped me at the line; there are no lead-out men in a two-man stage race. So you see who has the yellow jersey.
30 March, 2006
Product Update (UPDATED)
Velo Orange has received quite a few orders for the bell mount spacers; thanks. They should ship no later than the end of next week.
The toe clip leathering kits will also go into production. I've ordered a supply of needles and of waxed thread, but I'm still awaiting additional leather samples. I think the price will be $7. That's not a bad deal; Robert (in the comments to the previous post) said that a pair of leathered Christophe clips went for over $50 on E-Bay recently.
The flashlight mount is also on track. I've made two more pairs in stainless steel and finally nailed down the proper thickness of metal. The plan is to offer them in two standard sizes, one for C-cell flashlights and one for AA-cell lights. They will ship with leather to line the inside that can be applied with one of two thicknesses of double sided exterior grade tape. This will allow them to fit most flashlights.
Yesterday I worked on the new Velo Orange decaleur du sac, or handlebar bag mount. The search is on for a welder to make a small production run. My idea is to offer an inexpensive version of this type of rack: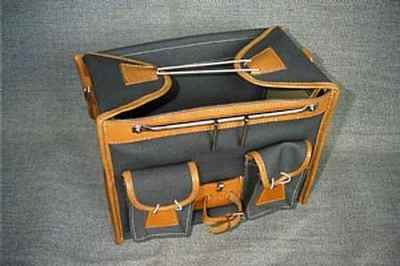
UPDATE: I've found a welder to make the decaleurs and we should have the first one by the end of the week. I hope to have them for sale within 2 to 3 weeks.
The leather toe clips covers will ship by the end of this week. I should say that the leather on the initial batch is a little softer and thinner that on the NOS Christophe toe clips I have. But if it wears out within a year I'll offer a free replacment.
The metal for the first batch of flashlight mounts is also due to arrive this week. Things are hopping at Velo Orange.
28 March, 2006
Toe Clip Leathers
 There are some small details on a bike that can make it seem truly special. One of these is properly leathered toe clips. But such toe clips are becoming impossible to find; so why not leather your own?
Starting with a small piece of buttery soft upholstery leather, I cut out the appropriatly sized rectangles. Then using a punch that evenly spaces the holes, I perforated the leather. The thread is a special bee's wax-coated traditional sailmaker's thread. And the needle is a blunt tip sailmaker's type.
Sewing on the leather took exactly 10 minutes per pedal by someone who has very little sewing experience - that would be me.
So once again I ask you: could this be a Velo Orange product? I was thinking of a little kit with the pre-cut and pre-perforated leathers, enough waxed thread, instructions, and the sailmaker's needle. Comments? Suggestions? Ideas?
26 March, 2006
Flashlight Bracket
It seems that with advances in LED technology the common flashlight could serve as a rider's primary light again, just as in those old Daniel Rebour drawings. So I decided to make a bracket to hold a modern 2 C-cell LED light (or any 2 C-cell light).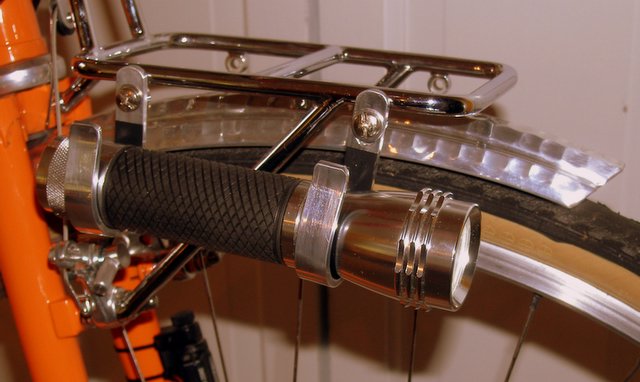
My prototype is fitted to the front rack of my new Ebisu, but by using P-clamps it will fit any front rack. The bolt holes are slotted so the up/down angle is adjustable.
The photo shows a 3-watt LED flashlight that costs under $40 and is so bright that it hurts to look into it. I'm not sure what the battery life is, but it's pretty long. With rechargeble C-cells it could serve as a main front light or a spare light for a randonneur.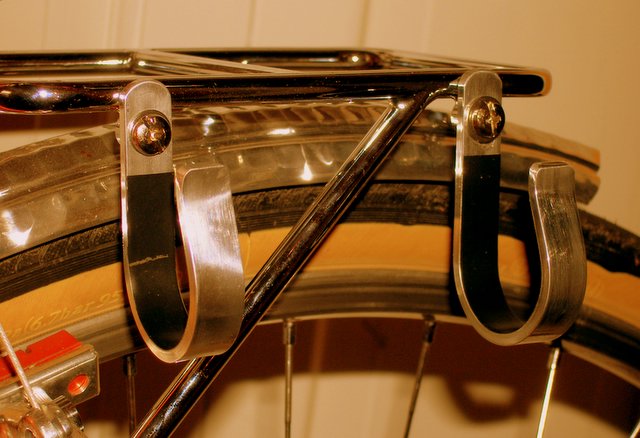
I made the prototype from aluminum bar only because I had some the right size, but I think I'll make the next one from stainless steel. With the thinner stainless version I hope to have the P-clamp bent into the bracket so it's all one piece. I'll make one for the TA rack on my city bike soon.
What do you think? Should this be Velo Orange's second product? Would you buy one? What changes should I make?
24 March, 2006
Ding Ding... (Updated)
One of the characteristics of fine bikes is a lack of stuff clamped on all over. There are brazed-on fittings for everything required.
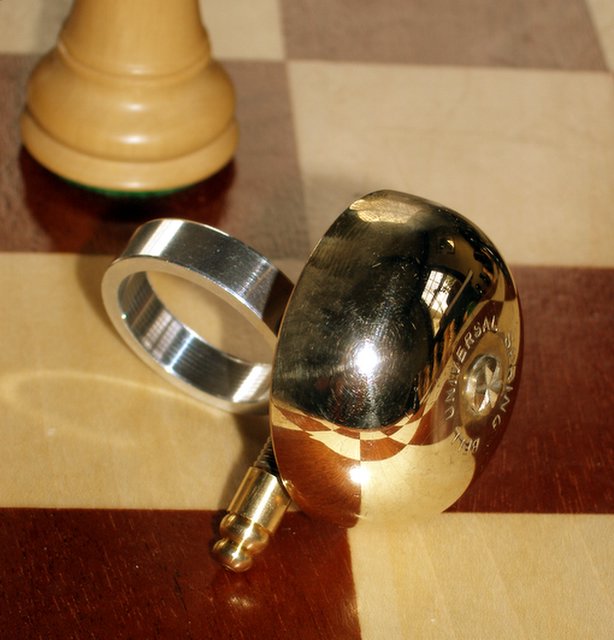
I often take a busy bike path out of town on my rides. So I decided to mount a bell on my new bike to warn pedestrians and slower riders. Of course, I chose one of those lovely Japanese brass bells. But how to mount one without a clamp? The French constructeurs tapped the bike's stem and screwed in the bell. I wasn't willing to do that to my Nitto Pearl stem.
My solution was to tap a headset spacer. I also added a small brass washer under the bell, all very elegant.
Perhaps this will be Velo-Orange's first commercial product. Would you buy one? Please e-mail or leave a comment if you want one or have any suggestions.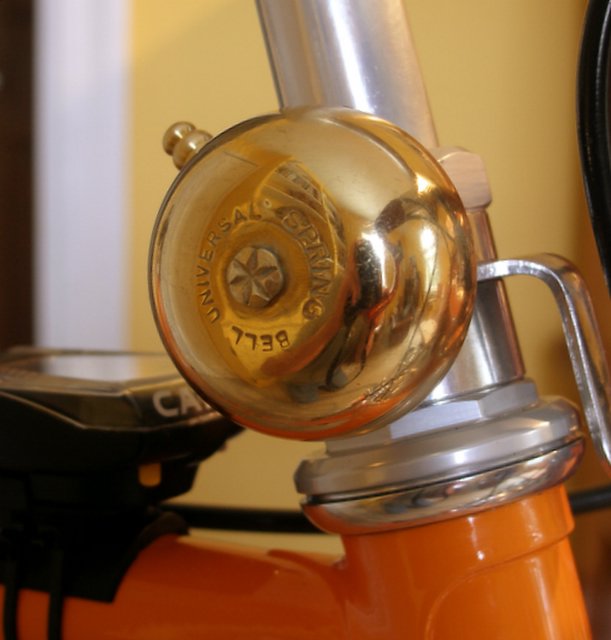

UPDATE
Since a few folks have asked to buy a spacer bell mount, I've decided to make a small run of them. I'll need to make a jig to ensure that the hole is centered, so they should ship within two weeks. The kit includes a 10mm tall spacer for either a 1" or 1-1/8" fork, two of the special brass washers, and instructions (not that there's much to it).
The brass bells are available at RBW and Jitensha Studio for under $10; I'll try to get some bells for stock. The first batch will cost $5 each. Shipping is $2 for any quantity. Let me know if the price sound reasonable; I'm new at this. I thought that a bell plus mount would be under $15, which is what cheap aluminum and plastic clamp-on bells cost at my local bike shop. Is this how GM got started?
22 March, 2006
A New Ebisu!
Nothing like getting a new bike. I just built up my new Ebisu frame and it is fantastic. The designer is Hiroshi Iimura of Jitensha Studio, who's been designing bikes since 1960. Here is a link to some photos of his early designs. The frame is built in Japan by Mr Hakuda, an NJS certified builder who runs a one-man shop.
Ebisu (恵比須, 恵比寿, 夷, 戎) is the "LaughingGod" in Japanese mythology. He is the God of fishermen, workingmen, and of good luck.
Here are the build specs. There are more photos here.
- Crank - Specialized triple 46, 34, 26
- Brifters - Campy Centaur 9-speed
- Rear derailleur - Campy Chorus long cage
- Front dreailleur - Campy Euclid
- Hubs- Shimano XT
- Rims - Sun CR18
- Tires - Pasela 32mm
- Seatpost - Ritchey/Nitto
- Saddle - Brooks Pro (may change to an Ideale 90)
- Stem - Nitto Pearl
- Bars - Nitto 115/45
- Headset- Ritchey WSC
- Front rack - custom
- Brakes - old Dia Compe (not sure of model)
- Pedals- MKS Cube (a great pedal)
- Fenders - Honjo hammered 43mm
- Water bottle cages - Delta stainless steel
- Size - 60cm c-c, 61.5cm c-t, 59.5cm tt
Applying Shellac
Shellacing handlebars is pretty darn simple, but I'll go through it step by step anyway.
Tools:
I've spent countless hours varnishing wooden boats, and one thing I've learned is that it pays to have a good brush. Good brushes hold more shellac and so don't need to be 'dipped' as often. They leave a smoother finish, and they last almost forever. Now I don't suggest you buy a $50 varnishing brush, but a decent quality bristle brush is worth the investment. I use a semi-disposible brush called "The Fooler" that's popular in the marine trades. It's made in Indonesia from pure bristle, has a proper wooden handle and costs around $2.
In addition to a brush, you'll need a bit of masking tape and some alcohol to wipe up any spills and clean your brush.
Preparation:
If you use aero brake levers or brifters, secure the cables to the bars with electrical tape or metal foil tape. I like the foil-type duct tape because it doesn't show through cotton handlebar tape. Tape your bars and put a wrap of masking tape (or any type of tape) around the center section of the bar to keep shellac off. Spread a drop cloth under your bike, or roll it outside. I don't bother to mask-off the bike because any shellac I drip on it can easly be wiped off with a paper towel dipped in alcohol. Mix your shellac according to the instructions and off you go.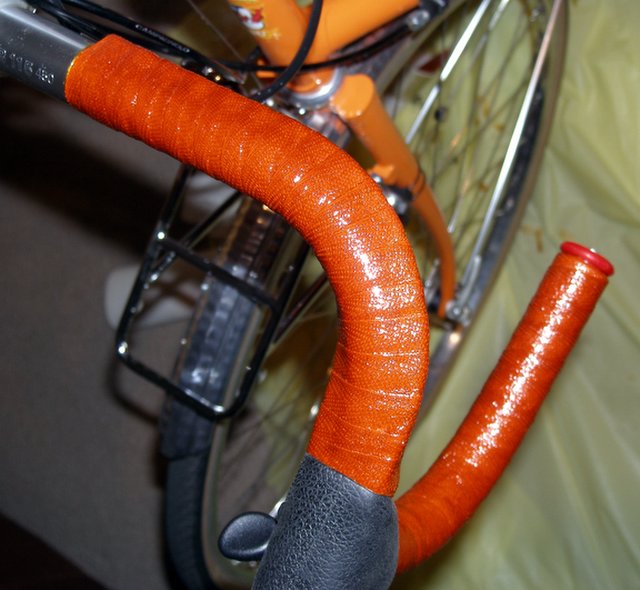
Application:
I pour as much shellac as I think I'll need into a paper cup or old jar; that's about 7 or 8 ounces for 6 or 7 coats. If any is left over after the job is finished it will be discarded, not poured back into the original container. This ensures that the original shellac is not contaminated.
The first coat of shellac will fill the weave of the cloth and use up as much shellac as several susequent coats. Brush it on as evenly as possible and don't leave any dry spots. I like to wait at least a couple of hours after the first coat to allow this first thick layer to dry. The longer the better. The next coat will darken the tape and be easier to apply. It will also dry in less time. You can keep adding coats as soon as the previous one has dryed until you achive the desired color and texture. In between coats I wrap my brush in Saran wrap to keep it from drying out rather that washing it.
Wrapping Handlebars Alex Singer Style
I decided to wrap the handlebars of my new bike in the style I've seen on some Alex Singer bikes. I think his method differs from that used by Rene Herse, for those of you who follow such trivia. Both methods involve starting the wrap at the stem-end of the bar, thus eliminating the electrical tape or twine required to finish a wrap started outboard and leaving a cleaner looking bike. But Singer's method involves wrapping the top half of the bar from the center out, and the bottom half from the end in. "But why is this better and who cares?" you ask. Well, Singer's method not only looks better, but it prevents the rider's hands from 'curling' the tape as he pushes forward on the drops.
If using brifters or aero levers, I like to secure the cables with duct tape (the good metal foil type) rather than with black electrical tape which can show through light-colored cotton tape. The metal duct tape is also used to secure the ends of the cotton tape under the brake lever hoods.
Wrapping bar tape is not easy and it often takes me several tries to get it looking nice and even. It usually takes 3 rolls of tape for any, but very narrow, bars.
Wrapping from the center toward the brake lever. Note the lack of twine ;<) 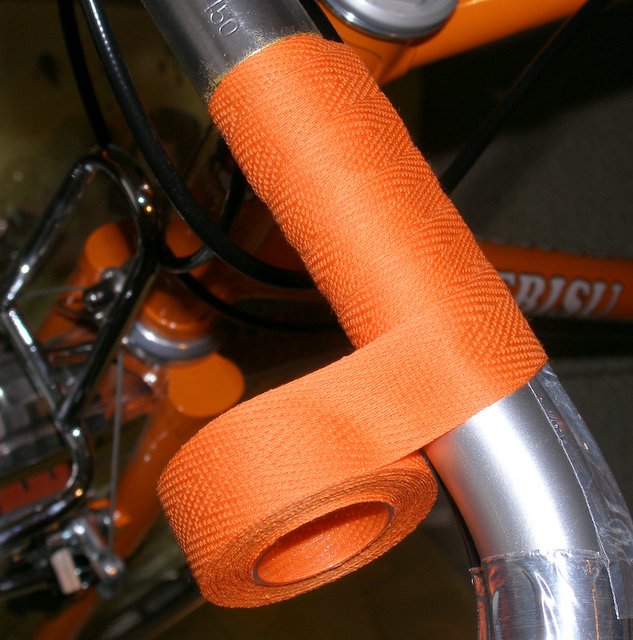
Wrapping from the bar's end toward the brake lever.

Shellac Basics
The great French builders usually wrapped handlebars in cotton tape coated with shellac. Today cork tape is the norm. While cork tape does provide better cushioning, it is fragile and needs to be replaced at least once a year. Shellaced tape lasts for years, or even decades. When it gets worn you can simply brush on a fresh coat. As for appearance, well look at the photos and judge for yourself. Even well worn shellaced tape has that special beauty or patina that's only evident in natural materials.
Yes, shellac is a natural material. It is the crusty secretion of the lac beetle (Coccus lacca) that lives in the forests of Assam and Thailand. It is a natural polymer that when dissolved in alcohol makes a varnish like coating sometimes called "French polish". Though I've never eaten any, I understand it's edible, however, denatured alcohol is not. You could dissolve it instead in good natured (grain) alcohol.
Shellac may be bought pre-mixed at most hardware stores in clear and amber tint. But it is better to mix your own from dry flakes that come in clear, amber, and garnet shades. Shellac should be fresh. Old shellac may not dry, will not be as clear, and may not be as water resistant as fresh. It must also be free of contaminents such as water. It is better to mix a small quantity of flakes with denatured alcohol as needed, rather than rely on a pre-mixed can that might be old. And since pre-mixed shellac is often available locally only in quart cans, the average rider will never use up even half a can before it gets old.
Shellac will add its tint to cloth tape. I like to experiment to find the best color tape and shellac for a particular bike. By the way there are several brands of cotton handlebar tape: Velox, Cateye, Tressostar, Viva. All are suitable for shellacing.
This photo shows the three colors of cloth tape I'm considering for my new bike.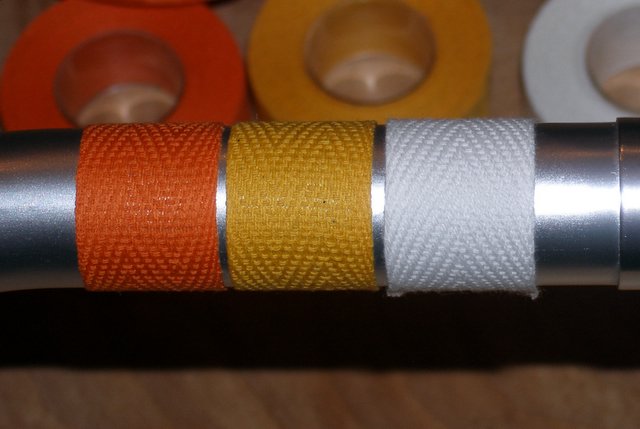
Here they are with a coat of shellac.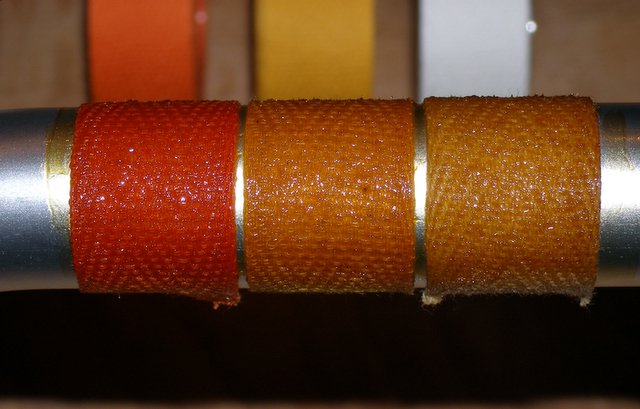
Subscribe to:
Posts (Atom)

 Posts
Posts