29 May, 2018

Igor's New Go-Fast Bike

by Igor


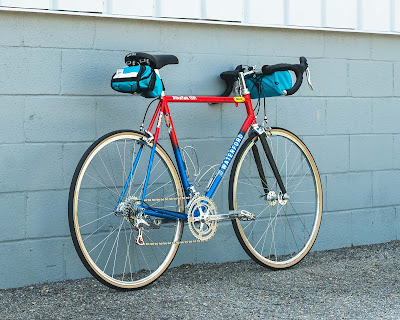
"Restomod" is a term that is thrown around among vintage internal combustion enthusiasts quite a bit. It involves the blending of old-world design with modern-day features to create a vehicle that is more reliable, safe, and comfortable. This mid-90s retired racer is just on the cusp of vintage, so I decided it was ready for a proper spruce up with a bunch of modern and a few not-so-modern components for a speedy restomod interpretation.


This is a mid-90s Team Mack issue Waterford 1200 road bike. It's built from Reynolds 753 tubing and Henry James lugs. In order to be able to employ this tubeset, builders had to go through a certification process to prove they know how to handle and fabricate using this super-thin, heat-treated tubing. You can't use use long-pointed, ornate lugs as the tube could crack over time, so the lugwork is short and simple.


This is where I'd put my race number - if I raced!
The Ventana fork uses carbon legs, alloy dropouts, 1" steel threaded steerer, and a very neat-looking CNC'd fork crown. It seems fine according to my eyeballs and the coin test, but I might replace it with a steel fork down the road.


Three-cross wheels lacing is tried-and-true, but I wanted to do something special for this build, so I employed the master wheelbuilding knowledge of Baltimore's own Tommy Barse of Cutlass Wheels to build up a set of 32 hole PBP Rims to a Grand Cru 11speed Touring Hub and a High-Flange Front Hub. Here's Tommy's take on the wheels and the nitty-gritty of the build:


"There was no hesitation when Igor approached me about building a set of wheels for his Waterford. Igor mentioned that he wanted a sporty, responsive design for more spirited riding. My choice of spokes was easy - Sapim D-Lights in the front wheel with their 2.0/1.65/2.0mm butting; Sapim D-Lights in the rear wheel on the non-drive side and Sapim Race (2.0/1.8/2.0) spokes on the drive side. The nipples selected are Wheelsmith silver brass - their finish is unparalleled in quality and longevity. I have not seen their Duristan finish fade, corrode or mar unlike other manufacturers’ nipples. I stock bulk 310mm uncut spokes from Sapim to cut to the proper length for each build. My Morizumi spoke cutter has been an extremely valuable tool to build quality wheels with just the right thread purchase between spoke and nipple.


The Velo Orange PBP rims measured very round in the four sections that I measure ERD for spoke calculation. The 2-cross spoke pattern for the front was selected for the wider bracing angle to provide better cornering and climbing stiffness for the shallow box section rim. The radial non-drive side and 2-cross drive side were selected for a little less weight and increased lateral stiffness. Being in the mid-Atlantic, especially Annapolis, I incorporated high quality DumondeTech MR grease on the nipple shoulders and Loctite copper anti-seize on spoke threads for ease of maintenance. Wheels turned out wonderful in terms of lateral and radial trueness. Several rounds of stress relieving proved the wheels are stable, allowing for confident riding in all conditions.


The neo-classic aesthetic is eye-catching and a nice balance of classic silver components with a less classically styled approach to semi-tangential spoking. These will serve Igor well for years to come!"

The wheels are all wrapped up in Fairweather Traveler Tires in the 700x28c sizeway. While the Rust color would have been cool, I think the black and tan combo looks superb.

Onto the drivetrain! The shifters are Campagnolo's 11speed Athena. They're all metal, silver, and have a very light actuation. They also fit exceptionally well on our upcoming Nouveau Randonneur Handlebars. The cockpit is held in place by our Removable Faceplate Quill in a classic Chrome finish. Once the fit is dialed in, I'll cut the excess quill to save dozens of grams.


The dangler is also Athena and is quite handsome. I swapped the unit's stock plastic pulleys with our 10T Alloy Jockey Wheels for two reasons: 1) since these replacement wheels don't float, shifting is super crisp and 2) they're red. Very red. 


The crankset is our 110bcd Drillium paired with an Athena pusher. While our rings aren't technically rated for 11speed drivetrains, I haven't experienced any issues with this group or Shimano's previous generation 105. Needless to say, if you want to run 11 speed on our cranksets, I'm very confident you'll be fine. All that said, Shimano and Campagnolo recently released their 12 speed drivetrains. So there's that...


The perch is our Smooth Touring Saddle. It's my go-to nowadays for all new builds. The seatpost is an interesting one. The seatlug requires a 27.4mm size and a 27.2mm would commonly crack the binder's ear over time. Luckily, this one is in good shape minus a bit of paint flaking.


All that speed needs to come to a stop at some point, and it is handled by a pair of single-pivot Dura-Ace caliper brakes. They're exquisite.


While clipless pedals would look great, I have found Sabots to be my pedal of choice.

To accentuate the gorgeous fade paintjob, I wrapped Grand Cru Leather Bar Tape over Red Tressostar Cotton Tape. When you're riding, you can see the red tape through the perforations. Details matter!

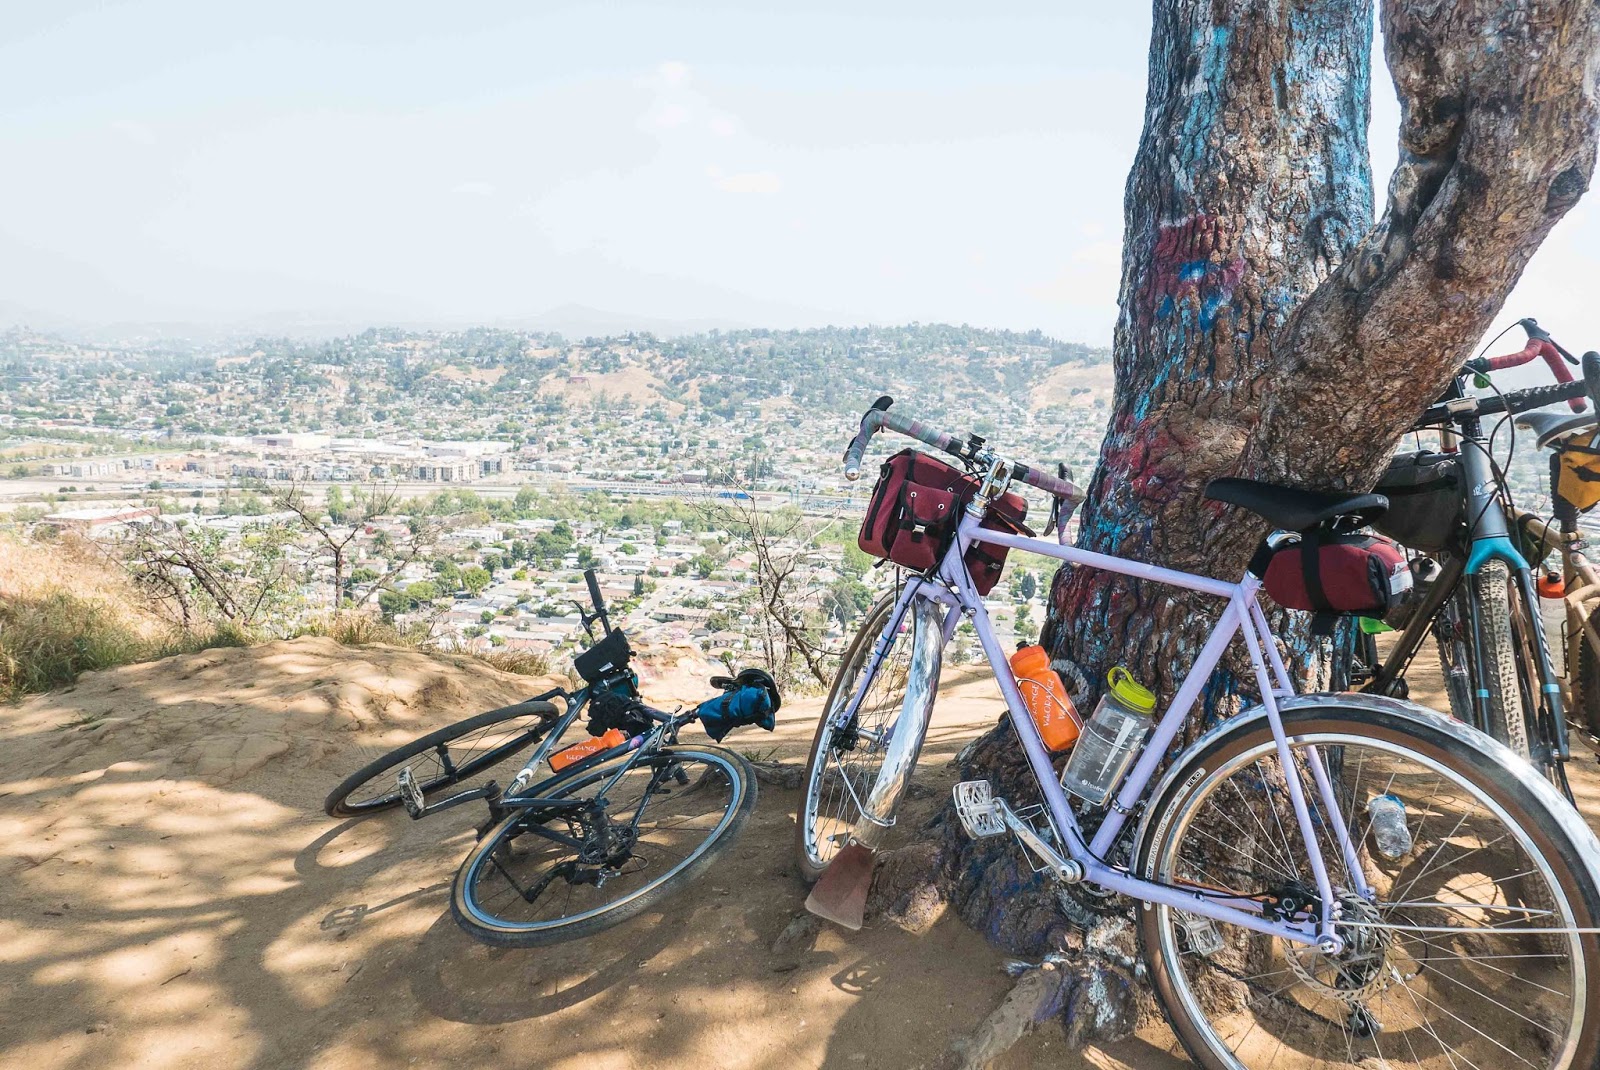
Finally, a bit of storage handled by a Day Tripper Saddle Bag and Road Runner's Burrito Supreme Handlebar Bag. It's a great combo for a camera, rain shell, tools, cell/wallet/keys, and a rolled up slice of pizza.

25 May, 2018

Closed for Memorial Day

by Igor

Droolium
VO is going to be closed on Monday, May 28th for Memorial Day observance and to give our hard-working staff some time off.

If you need anything to go out today (5/25), submit your order before 3pm EDT. Otherwise, your order will ship out promptly on Tuesday, May 29th.

So whether you're towning-around, shredding the gnar, or racing between cafes, have a safe and fun weekend!

23 May, 2018

Ah, The Glories of the Web

By Scott

"With great power comes great responsibility" is a phrase cited as far back as the French Revolution. It has been used by statesman, theologians, and comic book writers to illustrate the relationship between obligations and power.  With the rise of the Internet and such, power to the people was promised and in some way, it has been delivered.  I'm thinking of all the great tools out there for use by cyclists to make their lives easier. Here are a few sites that make our lives, and hopefully yours, easier.


Starting off with one of the best examples of a web site that does an a job that you don't realize you need until you need it is Jim G's stem comparison page. This site is simple and does a fantastic job of letting you compare current and proposed stem setups. Input the data for your current stem, enter your different stem, and play with the different stem angles and lengths to augment your cockpit setup. I'll be using this site when we get the Nouveau Randonneur bars in. I'm going to use our Replaceable Faceplate Stem and I'll be interested to compare setups.


One of the sites I visit on a daily basis here is Velo Base. It is a great treasure trove of information and photos about old parts. It is very nicely laid out to help you track down that older crank/derailleur/brake set you have and put a date to when it was made. The notes that many of the entries have can be invaluable to the collector/vintage bike enthusiast in terms of discovering if it has odd threading or tapers. If you ever want to know what the threading is on a Nevar crank and how it differs from a Stronglight of a similar era, this is the place to go.

We don't do in house wheel building for sale, but we do build wheels for ourselves when we need a specific application or to test a new product. To make the spoke length choices, Igor and Clint use pro wheel builder for their spoke calculations. While there are several spoke calculators our there, they've found this site easy to use and accurate.

When it comes to tools, Park is the one at VO.

When it comes to fixing bikes, one name comes to mind - Park Tools.  Their website is a great resource for both tools and how to use those tools to get your bike rolling or rolling better. I often forward a link to folks who are looking for instructions on how to do X or Y as I've not found a better site that lays out how to do so much, with great photos of the process.

Finally, we can't mention web resources without mentioning the late Sheldon Brown. If you ever want to go down a rabbit hole of information, then Sheldon's site is the one to start with. I have his crib sheet site on my bookmarks, as it is a quick way to find details about chain line, headset sizing, and tire sizes. If you go into the main site, there is just so much information, laid out so well, that it's shocking that it's been 10 years since Sheldon passed away.

Are there any sites you find useful that you don't think the average cyclist knows about? Let us know in the comments and let's add to people's knowledge.

Reader submitted links from various social media sources:

14 May, 2018

Bike Build Idea: Welcome to the Basket Life

by Igor

My first extended use of bike basketry was in college. In between cutting pennies in half to save up for new panniers and running to classes that were way too early, I would ride to the local grocer on my MTB/Townie conversion with a well used Jim Blackburn rear rack and basket found around (not in!) a dumpster. Loaded with the staples of college life, I would ride back hoping that the bungees would keep everything secure long enough to get home. Since then, I moved on to panniers, handlebar bags, and dedicated rack mounted bags.


In more recent years, the simple basket has made a resurgence in popularity for mainstream tourists and commuters alike. I think it's a bit of a backlash from bikepacking luggage and its often times over-complex system of straps, pads, inaccessible from the saddle dry bags, more straps, lashes, plastic holders, and straps. It's a happy medium between the practicality of traditional touring bags and the out-of-the-way-of-obstacles afforded by bikepacking bags.

Whether practicality or guidance from the Deep Basket State, I was feeling the gravitational pull of Basketlife. And with our new Transporteur Bag, I can relive throwing everything in a sack on the go, while having everything properly secure and dry.


Here is my Polyvalent to which I added a Wald 137 Basket and Transporteur Bag. The daily commuting load isn't heavy enough to necessitate the carrying potential of a Porteur Rack, but the added volume is welcome for grocery runs on the way home, portaging business stuff around town, or packing extra photography equipment.


Adding a basket to your Randonneur, Constructeur, or Porteur Rack is a breeze. P-clamps are sturdy and semi-permanent, but I like the option of taking the basket off if I want to use a traditional handlebar bag for on-bike accessibility during long rides. A hearty set of strategically placed zipties makes quick work of installation.

While the Transporteur is designed to work best with our Porteur Rack, the bag also works perfectly with the Wald 137. The lower straps and buckles go right through the wire mesh and connect to the upper roll-top buckles. It's easy as pie. You can use the included velcro straps as well, but I didn't find it necessary once the sides are cinched up.


I added a Snapper Sack and Cell Phone Pocket to the outside of the basket for quick access to my angry (seltzer) water and snapgram machine.


I've been happy with this new do-it-all setup? How is your do-it-all ride set up? Flat bars? Internal gearing? Wet brakes and robo-shifting?

11 May, 2018

Measure Once, Cut Twice

By Scott

When I went to school, it was mandatory to take a variety of shop/home economics classes in grade 8. Both boys and girls took classes in woodworking, cooking, sewing, metal working and electrical work in order to introduce us to different trade opportunities and ensure that each of us could do basic sewing and cooking at home. This was where I first heard the term, measure twice, cut once. Now having gone on from the workshops of Hugh Boyd Jr Secondary to working in a bike shop of 900 sq feet, to cutting aluminium and plastic for a folding kayak maker, to fixing my bikes and my wife's bike over the years, I've picked up a couple of things.


When it comes to cutting things, always measure at least twice. Preferably, use metric measurements to determine the length of things. Math was always a failing of mine, so an imperial tape measure brings on anxiety. The tape measure I use here at work is a cloth one from a fabric shop that has metric on one side and imperial on another. This way if someone calls and says they measured X and it is 20 1/4", I can find that on one side and flip it over to see what the metric equivalent is (51.4 cm FYI). See, tricks of the trade already.

If you are going to error in terms of cutting, always cut on the outside of the line. That way, if you are a hair long, you can file/shave down the item. With things like steerer tubes or fender stays, no matter how far you bury them in the ground and provide nutrients, you can't make them grow longer once they're cut. So err slightly to the long side if you have to.

Always have a cup of tea or coffee on hand to sip on while taking measurements and cutting. The act of reaching and sipping gives one time to think about what we're doing and determine if we really did do the math right for calculating the mechanical advantage of the Zeste Brakes I'm installing.


Also, know where to find spares of stuff. Our most common spare parts are for fenders. In fact, we have a whole section of just accessories and hardware to help folks out if they have somehow lost something or as is the case often with stays, cut them down for one size tire/wheel, but now want to move the fender to a new bike or put on larger tires. then you need longer stays. The stays themselves are all the same length, 40 cm from the apex to the tip. The width of the curve where they go over the fender is where they vary.


We also sell bolts for rack and for bottle cage attachment. We have housing caps for older French and Italian bikes that use 4 mm cable stops, when all the modern cables are 5 mm.  Having an easy to find container or box to put all the backup parts also helps. I keep a bin at work that is properly labeled so that other folks can find small parts that I've put aside for just "that" occasion. Toss stuff into a little zip loc (you can even write on the outside with a sharpie if you want to keep it even easier to keep track of) and voila, a little box of bits that you'll always find handy.

What sort of small bits are you constantly looking for?

08 May, 2018

Container Arrives: Restock of Crazy and Klunker Bars

by Igor

We just got in a container! We're excited to see our newest addition and some familiar faces back in stock.

Check out our new 50mm 26" Snakeskin Fenders to fit with 26" tires that are 42mm and under - the sweet spot for many world class touring bikes.

While the Klunker and Crazy Handlebars are considered by many to be "alt-bars", we consider them to be supremely comfy, utilitarian, and a fun addition to any off-road tourer or urban rider.


In addition to those bars, we also restocked on a number of parts and accessories:
The Piolets, Polyvalents, and Campeurs are almost out from paint. I apologize for the delay in delivery and appreciate your patience. The process between approving prototypes and final delivery is fraught with dozens of opportunities to delay production. Between frame component supply, packed production schedules, tooling adjustments, QC, paint and decaling, and final QC, we're expecting final delivery in Mid-June. Again, we appreciate your amazing patience.

01 May, 2018

Thanks for the Great Times, LA!

by Igor

We just got back from Los Angeles, where we had a lovely group ride followed by a meet n' greet at our bag manufacturer, Road Runner Bags. It was a great time, so sit back and enjoy our photo essay.

Starting out from the coffee shop (where all rides should always commence), we tracked through the city, crushed a series of gravel roads, and finally meandered a ton of narrow, dusty, single-track trails. Had I turned Strava on, you would see a spaghetti of red lines, speeds exceeding 30mph on the downhills, and speeds reduced to 0mph for sections that required a good 'ol hike-a-bike.

We had a terrific group of riders and sincerely enjoyed every minute of the trip!


Rollin' deep

Tony's Black Mountain Cycles was wearing a Randonneur Front Rack and Handlebar Bag


Mike, all the way from Australia!

Tony with his googly-eyed Rando Bag


This nicely set up Niner had Dajia Cycleworks Far Bars. A wonderful choice for mixed terrain riders.

Day Tripper Saddle Bag with a freshly found future-telling crystal.

Fenders and all, run what you brung.

Sean's custom frame had a Postino Handlebar and City Brake Levers.

Overlooking the 101.


Ester looking fly as always.

Stephanie's mega wheelie!

Clint's Piolet looked right at home on the dusty and rocky trails.

An alternate descent.

Zooming back into the city


Filipe on the Polyvalent in Porteur mode with a Transporteur Bag.

Once we got back to the shop, brews and good times were had. We revamped RRB's showroom space to display our luggage collaboration. Look closely and you'll see a color that we're thinking of putting into production.


The jersey was a hit.


One of the most radical custom low-riders I've ever seen.

Loafin'

Yep, there's a hoof in that Mojave Bottle Cage.

Another Randonneur Bag, this time on Alex's Wolverine.

Samba crew checking in


 A big thanks to Road Runner Bags and LA for hosting us!