08 July, 2015

The Piolet Frame is Here

The Piolet, our new adventure touring frame, is here. It's designed for off-pavement touring, including dirt and gravel roads, dual track, single track or no track at all. We built it to be sturdy, simple, and very capable.

Note the bosses for racks and fenders.
As with our other frames, it's built from double butted chrome-moly, including the fork. The seat stays are a cool mono-stay design. The fork is also our own segmented design and loaded with bosses for mounting racks, water-bottles, gear cages, and even fenders. Both the frame and fork were tested to meet MTB standards.

The non-suspension corrected fork looks great.
The Piolet frame is not suspension fork corrected. This really improves the appearance and helps us optimize handling.
So many eyelets!
It uses disc brakes. You can go with hydraulic brakes, but we prefer the simplicity of mechanical (cable) actuation.

The small and extra-small sizes use 26" wheels (easier to find than 650b in remote locations). The larger size frames all use 700c, or 29er, wheels. The Piolet is designed for 2.4" tires, but larger tires will fit.

You can also use 650b (27.5") wheels on the larger size frames (M, L, XL). We find that 650b x 2.8" wide tires have almost the same diameter as 700c x 2.4", so handling will be as intended and there is sufficient tire clearance.

Again, note all the eyelets and bosses.
There are mounts for five water bottle cages. Two of these are on the fork. The Piolet has full mounts for front and rear racks. You can set it up like a traditional touring bike or bike packer style. The mid-trail geometry allows for front or rear loading.
Fender boss and front derailleur cable stop.
There are proper fender mounts; this is a VO frame after all.

We've designed the Piolet to work equally well with drop bars and with flat bars.

Here's the technical stuff you or your mechanic will need to know when building it up. 135mm rear spacing with vertical dropouts. IS mount disc brakes, cable or hydraulic actuation.  27.2mm seat post. Bottom pull and bottom swing front derailleur. 73mm standard British, or ISO threaded bottom bracket.  1-1/8 inch headset.

The geometry chart can be found here.


07 July, 2015

A Wider Microfiber Touring Saddle

Our original VO microfiber touring saddle has been very popular. That's not surprising since it's much lighter and less expensive than a leather saddle, yet still very comfortable. With its suede-like top it also retains the look of a classic saddle. We've now added a wider version, designed for folks who keep their handlebars at or above saddle height, or who simply find a wider saddle more comfortable.

At 165mm wide it's about the same width as a VO Model 3 or Brooks B17 leather saddle. But that's somewhat deceptive because there are no rivets or a flaring leather "skirt." So the sitting area is comparable to a slightly wider leather model. 

At 425gm the weight is significantly less than that of a modern leather saddle. Length is 282mm, about the same as a Model 3.

There are loops for a saddle bag, which so many of you asked for, and a proper metal nameplate.

These microfiber top's texture keeps you from sliding around and it's weather resistant. The body is thermo-plastic with a layer of high density foam. The rails are chromoly. By the way, no microfibers were hurt in the manufacture of these saddles--all materials are vegan approved.


The photo above shows the original and the wide versions side-by-side.

02 July, 2015

Closed for Fireworks, and Riding, and Site Maintenance

by Annette

Velo Orange will be closed Friday, July 3, for the  Independence Day weekend and general revelry.

As well, the website  may be down at times over the weekend: We are refreshing it so it is better compatible with your tablets and smartphones. Of course, we'll try to minimize the disruption as much as we can, but if the site is down it means that even the staff can't get into it to check on things. (We assume you'll be out on your bikes and not looking at the site anyway, but just in case...)

Those of you in the Bend (OR), Boise (ID), and Salt Lake City (UT) areas can catch the VO Grand Cruz rolling through from July 5 - July 9 on its way to RAGBRAI in Iowa July 19 - 25. And everyone from the west coast to Iowa should check the Cruz blog for weekly schedule updates and reports.

29 June, 2015

Our New Long Setback Seat Post

We've offered the VO Long Setback Seat Post since 2008. It's a great post, especially so for folks who use leather saddles, which usually have shorter rails than plastic saddles. It's also nice for those who like a slacker seat tube angle, getting the saddle further behind the crank. But after all these years we decided it was time for an update. So after much design work and testing we recently introduced the MK 2 version.

The new version has a few advantages. It's stronger. It's easier to adjust. And it has a larger purchase area on the seat rails, which minimizes seat rail scuffing.  But we kept the best features of the original design. The post and head are still one piece, not pressed on like cheaper posts. The post is still internally ovalized for light weight. It still uses a two bolt design that adjusts from the bottom. The clamps mating surfaces are smooth, not notched, for fine adjustment. And there is still a generous 30.2mm of setback, just like the first version.

The new version is available in silver or in black, but only in 27.2mm diameter and 300mm length.

24 June, 2015

Igor's How-To

by Igor

The Grand Cru Rear Cassette Hubs have been a favorite amongst cyclotourists and randonneurs for their simplicity, reliability, and easy serviceability. The hubs use high-quality Japanese sealed bearings, a hub body design of our own, and a 10-speed compatible steel Shimano splined freehub body (or your choice of Campy or alloy). The freehub body features 3 pairs of robust pawls.

By using a threadless freehub system, driveside maintenance or spoke repairs can be done sans tools – no specialty tools and no complicated diagrams. Here’s how:
Undo the quick release or anti-theft skewers and remove wheel from the dropouts.


Remove quick release from the axle of the hub and set aside. Remember, when you pull the freehub body/cassette away from the shell, the non-driveside endcap will be freed, so put it into your pocket. You can pull the axle off the freehub body as well, but it's not necessary. The driveside endcap will stay on the axle by friction because of the rubber seals, but keep an eye on it. Better yet, put it into your pocket.

Now that you have the freehub body off, you can do a cleaning of the driveside flange (this always gets over-looked), the pawls, and the ratchet ring. If you've broken a spoke, replace the spoke.

Use a clean rag and wipe the pawls in the direction of engagement. Inspect the spring of the pawls.
Clean off the ratchet ring, quick wipe will do here.

Apply a small dab of thin gear oil to each pair of pawls. Chain lube works fine. Phil Tenacious oil works very well, too. Don’t use thick grease because the pawls may not pop back up!
Insert the axle into the shell and reassemble. Don’t forget about the endcaps in your pocket! Give the cassette a quick spin to ensure good pawl engagement.
Put the wheel back into the dropouts and tighten the skewer.

Hop on your bike and enjoy!

--------------------------------------------------------------------------------------------------------------

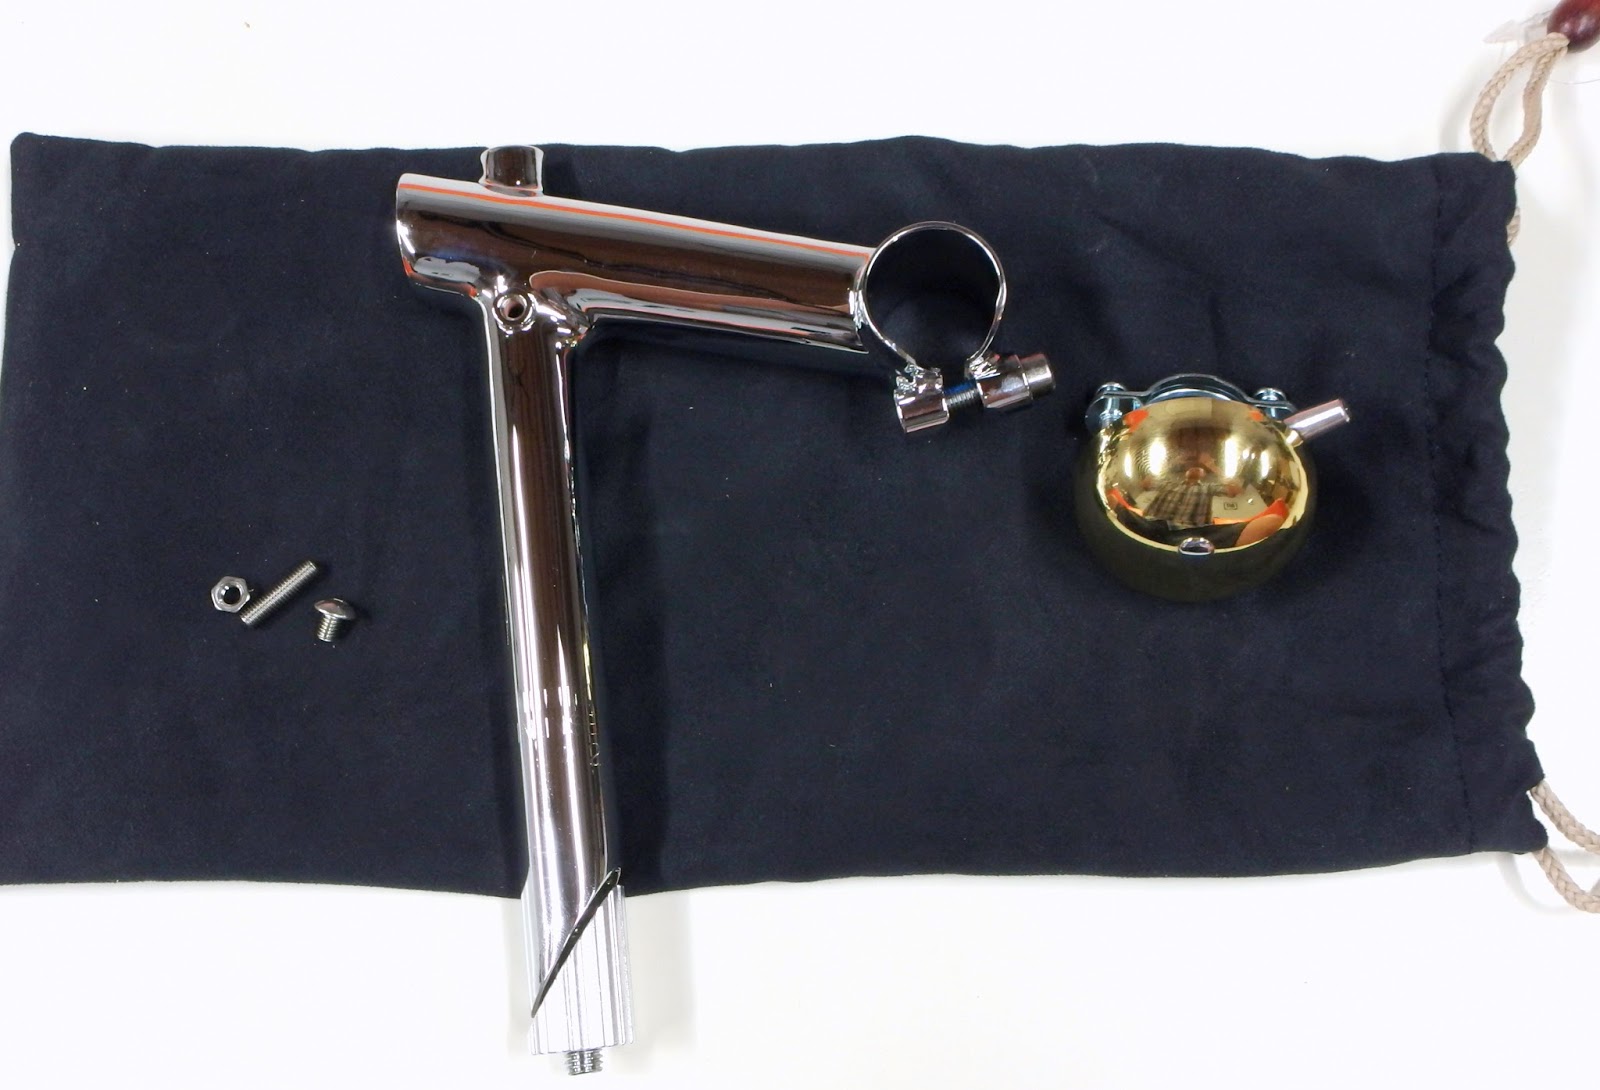
One of the facets of a beautiful constructeur-style bike is the detail work. To eliminate clamps and cluttered handlebars, builders would drill and tap the side of a stem to mount a brass bell which patinas nicely over time. With the Grand Cru Quill Stem, we have done the same. Installation of Brass Temple Bell onto the stem is quick, easy, and secure.
The hardware on the left comes with your new stem for installing the bell. The microfiber bag also comes with your stem and has a slew of wonderful uses.
Disassemble the bell by giving a good twist. The clamp threads into the bell body and the spring is flanked on both sides by a series of flat and split washers, take note of their positions relative to the bell body.

The set screw will thread into the bell housing. The bell is an obscure Taiwanese threading which is ever-so slightly different than the M5 threading of the bolt, so use a dab of grease and tighten it down. It will thread and stay secure just fine. The button head screw is included in case you may not want to use a bell.
Reassemble the stack of hardware and put the nut onto the set screw. Snug the nut onto the assembly. Put a dab of grease on the end of the set screw and thread the bell into the stem.
You may have to play with the orientation of the striker to get a good striking position once you thread the bell into the stem. Simply loosen the nut, turn the striker a few degrees, snug up the nut, and tighten the bell down by hand.
Insert stem into your steerer and enjoy!

--------------------------------------------------------------------------------------------------------------
The Constructeur-Style Rubber Grips are the perfect finishing touch for Adrian's 1970 Bertin mixte. The only snag is that they are designed to work with flat handlebars that do not use bar-end shifters. So here's how we modified the grip to work with her setup using just a knife, sandpaper, and denatured alcohol.
Install the grip onto an old handlebar or pipe. Using alcohol makes installation significantly easier.
Start cutting just behind the bulge and go all the way around.
Use a small piece of sandpaper to smooth out the rough edges from the cut.
With the shifter, cable, and housing installed, shift the rear derailleur into a lower gear so the lever is inline with the bars. Use generous denatured alcohol to start sliding/twisting the grip over the shift lever and over the housing until it's in the proper position.

After installation, let the grip rest for 24 hours so the alcohol evaporates and the grip stops rotating.

Hop on and enjoy!

19 June, 2015

Half Hoods for Mafac Brake Levers, Rustines Caps, and other Cool Stuff

By Chris

I really like Mafac brake levers. They are a little wider than most classic levers and better fit my hands. The hoods are also thicker and more comfortable than the Italian type. Most constructeur bikes used these levers and often had these cool half-hoods. These hoods attach with a metal clip that fits into the little recess on the back of Mafac levers. The originals are very rare and expensive, so these French made Rustines hoods were sorely needed. Used Mafac levers, unlike the hoods, are common and inexpensive, not to mention very cool looking; you shouldn't have any trouble finding a pair.

These hoods are available in gum and black, just like the originals. You may notice that the gum version is darker than the Campy-style hoods. That's because the original French gum rubber was darker than the Italian gum; it's great the Rustines went to the trouble to replicate the original color.


If you prefer full hoods, we have those, too. They are also available in gum and in black. These are even thicker and more comfortable that the half-hoods, though not as stylish.
We have just a few of these Rustines cycling caps in white or blue. I like these because they are a little bigger than most cycling caps and so a better fit on my fat head. The motto under the bill can be translated as "you can flat" (in reference to Rustines patch kits), or as "you can die." This has been a Rustines motto since just after World War One, when dark humor was popular. You can read up on proper cap fitment and etiquette here: http://cyclingtips.com.au/2012/04/how-to-wear-a-cycling-cap/


Also, we now have blue constructeur grips.

The Rustines stuff is selling really quickly and we may have trouble keeping everything in stock for the next couple of months. We're placing bigger orders and should have a steady supply soon. If you own a shop, get some of the patch kits; cyclists love them.

We'll have more of the VO porteur bags later today, another item that's been selling out very quickly.

16 June, 2015

New Products and New News

By Chris

Our very popular Course handlebar is now available in black. I really like these bars because of their open bends and long flat sections that offer a wide  variety of hand positions.
We have the VO 31.8mm stem in stock again. We had discontinued these, but folks kept asking for them so we made another production run. I wonder if we should do a black version?
This is a rather expensive dropout we had made for an upcoming frame. We're pretty proud of the design; when you see the rest of the bike you'l know why.
Many of you have asked for the Piolet geometry. You can now find it here. It's also listed on our frame comparison table.
John and Kate attended the opening of the Marin Museum of Bicycling and Mountain Bike Hall of Fame. Check out their post and photos on the Grand Cruz Blog. You might also want to follow their Twitter feed and Facebook page.
The French tall ship Hermione  arrived in Annapolis yesterday. It was really cool to walk down and see her this morning. Lots of festivities and a parade are taking place. I hope to go aboard tomorrow. Hermione was a revolutionary war era ship that brought General Lafayette to America; without him we might still be a British colony.