
by Igor

By using a threadless freehub system, driveside maintenance or spoke repairs can be done sans tools – no specialty tools and no complicated diagrams. Here’s how:


Now that you have the freehub body off, you can do a
cleaning of the driveside flange (this always gets over-looked), the pawls, and
the ratchet ring. If you've broken a spoke, replace the spoke.
Use a clean rag and wipe the pawls in the direction of
engagement. Inspect the spring of the pawls.


Apply a small dab of thin gear oil to each pair of pawls.
Chain lube works fine. Phil Tenacious oil works very well, too. Don’t use thick grease because the pawls may not pop
back up!

Insert the axle into the shell and reassemble.
Don’t forget about the endcaps in your pocket! Give the cassette a quick spin to ensure good pawl
engagement.

Put the wheel back into the dropouts and tighten the skewer.
Hop on your bike and enjoy!
--------------------------------------------------------------------------------------------------------------
One of the facets of a beautiful constructeur-style bike is the detail work. To eliminate clamps and cluttered handlebars, builders would drill and tap the side of a stem to mount a brass bell which patinas nicely over time. With the Grand Cru Quill Stem, we have done the same. Installation of Brass Temple Bell onto the stem is quick, easy, and secure.


 Reassemble the stack of hardware and put the nut onto the set screw. Snug the nut onto the assembly. Put a dab of grease on the end of the set screw and thread the bell into the stem.
 You may have to play with the orientation of the striker to get a good striking position once you thread the bell into the stem. Simply loosen the nut, turn the striker a few degrees, snug up the nut, and tighten the bell down by hand.
 Insert stem into your steerer and enjoy!
--------------------------------------------------------------------------------------------------------------
 The Constructeur-Style Rubber Grips are the perfect finishing touch for Adrian's 1970 Bertin mixte. The only snag is that they are designed to work with flat handlebars that do not use bar-end shifters. So here's how we modified the grip to work with her setup using just a knife, sandpaper, and denatured alcohol.
 Install the grip onto an old handlebar or pipe. Using alcohol makes installation significantly easier.
 Start cutting just behind the bulge and go all the way around.
 Use a small piece of sandpaper to smooth out the rough edges from the cut.
 With the shifter, cable, and housing installed, shift the rear derailleur into a lower gear so the lever is inline with the bars. Use generous denatured alcohol to start sliding/twisting the grip over the shift lever and over the housing until it's in the proper position.
After installation, let the grip rest for 24 hours so the alcohol evaporates and the grip stops rotating.
Hop on and enjoy!
--------------------------------------------------------------------------------------------------------------
One of the facets of a beautiful constructeur-style bike is the detail work. To eliminate clamps and cluttered handlebars, builders would drill and tap the side of a stem to mount a brass bell which patinas nicely over time. With the Grand Cru Quill Stem, we have done the same. Installation of Brass Temple Bell onto the stem is quick, easy, and secure.
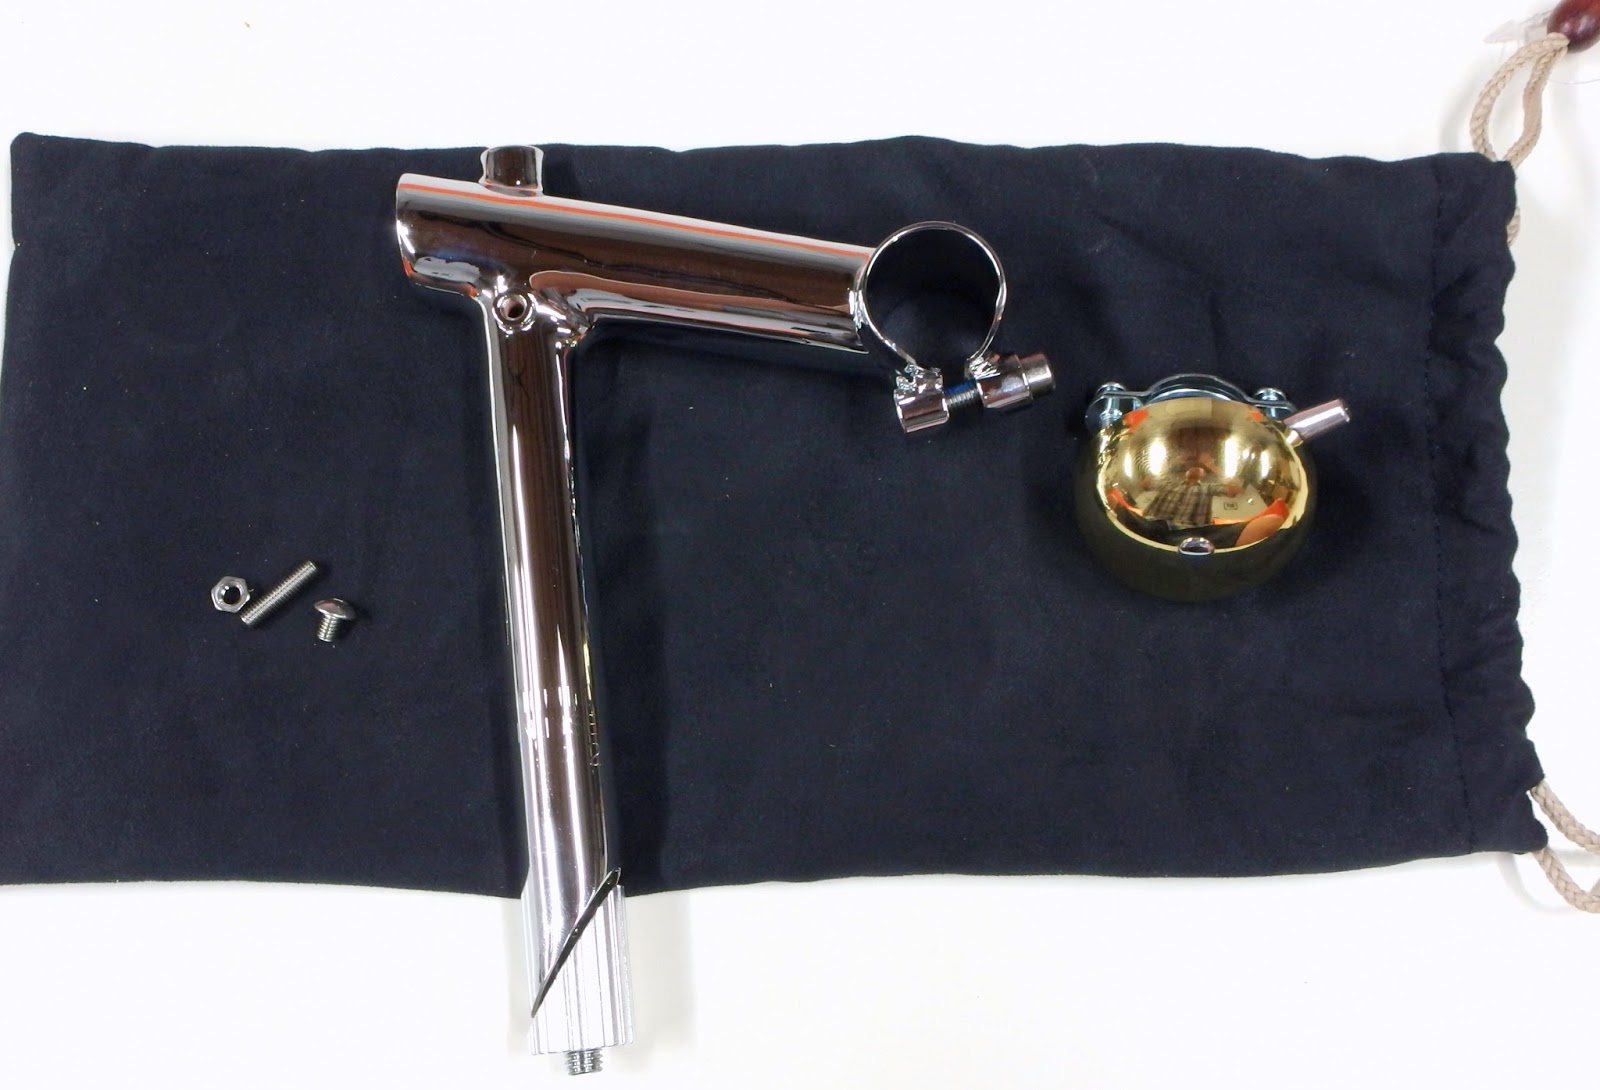
The hardware on the left comes with your new stem for installing the bell. The microfiber bag also comes with your stem and has a slew of wonderful uses.

Disassemble the bell by giving a good twist. The clamp threads into the bell body and the spring is flanked on both sides by a series of flat and split washers, take note of their positions relative to the bell body.


The set screw will thread into the bell housing. The bell is an obscure Taiwanese threading which is ever-so slightly different than the M5 threading of the bolt, so use a dab of grease and tighten it down. It will thread and stay secure just fine. The button head screw is included in case you may not want to use a bell.


--------------------------------------------------------------------------------------------------------------


After installation, let the grip rest for 24 hours so the alcohol evaporates and the grip stops rotating.
Hop on and enjoy!


10 comments:
A drop of liquid soap also makes getting the grips on easier.
Over the years, I've used a drop of dish soap, alcohol (rubbing 70%+ and denatured) and cheap hairspray. My best success rate for long term installs has been the hairspray with denatured alcohol a virtual tie probably due to the amount of alcohol present in the hairspray. For me, I've found that the grips that I soaped on ALWAYS ended up twisting on me as if they had some sort of Chubby Checker soundtrack going.
Over the last dozen years or so I've become a convert to clamp on grips. First I tried ODI Rogue Lock-Ons on my trail rig and commuter and later I swapped the commuter bike over to Ergon GP1 grips which also use a clamp system. I find that clamp ons are less messy to install / remove and more secure feeling (both physically and in my head) than traditional grips. but as always Your Mileage May Vary.
Thanks Igor, the Grand Cru rear hubs are truly a wonderful thing. I really like these hubs a lot, they are top quality which is why I have them on the two bikes I ride most. The ability to replace a broken spoke in the field, requiring only slightly more time than it takes to fix a flat is without equal but if there is one thing that, for me, casts a dark shadow over them is the amount of noise they make. I am old enough to remember when kids hung baseball cards on their frames with clothes pins so the cards would hit the spokes and make a clicking sound - supposedly to make the bike sound like a high end English racer (delusional kid behavior). This is what I think of every time I hear it when riding and it’s just not necessary. If anyone has ever ridden a bike with a dead quiet freewheel they know what pleasure it is to coast along in pure silence. It’s even more fun to stealth up behind a Roadie and see their look of surprise when you unexpectedly slide past them on a retro bike sporting fat tires and fenders.
The year is 2015 and ratcheting mechanisms have been around for centuries (think of clocks), they can be made to be very quiet indeed so why do the ones in modern bike hubs continue to be so loud? Is it a marketing thing like what Ford did with the exhausts on the late model Mustangs making them sound like Steve McQueen’s from the movie Bullitt - baseball cards equals English racer? Please don’t anyone tell me that machine noise is the sign of a higher quality product, that’s like saying a BMW motorcycle is cruder than a Harley because one sings with the smoothness of a sewing machine and the other sounds like an antique farm implement in a potholed field, anyone whose hearing works at all can tell the difference. As a former machinist I find a noisy ratchet system to be crude and I would have never considered using these hubs if it were not for all the other exceptional attributes. I offer up a challenge to the folks at VO – take the hub to the next level and please get rid of the damn clicking.
@ Anonymous
Check out http://pardo.net/bike/pic/mobi/d.winners-hub/index.html
The upshot: Roller clutch hubs are heavy, weak, as well as being expensive to buy and produce.
I'll take a reliable clicky hub with lots of engagement points (important when maneuvering up a technical climb or even starting out under load while touring or utility biking)over one that's prone to failure randomly by either locking up while coasting or slipping under load.
Thanks for the link to Pardo's roller clutch site. Certainly reliability is preferable to silence. But is the tradeoff necessary?
That page also includes discussion of freehub and freewheel noise. I've been puzzled by the wide variation in loudness, and why my old Suntour and Shimano freewheels are so much quieter than new hubs. I would certainly appreciate something a bit quieter.
@Anon,
A drop of Phil's Tenacious Oil on each pawl will quite down the ratchet noise.
@ Anonymous
I apologize if this gets confusing or ranty, but I haven't had much sleep before posting this or in general the last couple days.
First, you're comparing apples to oranges. FreeWHEELS are typically larger heavier pieces that absorb a good deal of sound in the first place due to shear mass. They also tend to be factory lubricated though one could extend their service life by oiling them with a heavy weight oil. (something I always insisted on doing when installing even a brand new freehub. Secondly, (to complicate things further) when it comes to freeHUBS we're also talking about two separate design philosophies Shimano style cassette drivers are screw on cartridge style mechanisms that bolt onto the hub by means of a hollow bolt concentric to the axle. Being a cartridge unit (not meant to be user serviced)* they are lubricated using a certain viscosity of grease and have small pawls and engagement teeth in order to fit inside the driver cartridge. Flip to the design favored by VO and others (due to copyright or whatever) and the driver now has the pawls built externally into the unit and the engagement teeth are part of the hub shell. The fact that the teeth are larger and engage in the hub shell itself will make this design louder by default especially when lubricated by oil as is commonly specified. However this design is easily serviceable and, one could argue, more robust than that of the Shimano style driver due to the larger teeth, more engagement points etc. Phil's Tenacious Oil is what I think of as a halfway point between grease and oil**, where one would want a heavier lubricant without the potential gummyness of something like a bearing grease, so I would be confident that it should quiet things down to a degree but it will never make the hub "silent".
*Morningstar produced a tool system and replacement seal a while back that would allow you to re-grease these drivers but the company is now defunct after the proprietor's death.
**It's akin to 90wt gear oil and in practice, I've switched back and forth between the two and could see no discernible difference between the two but that's another kettle of fish.
I like the mod on the grips. I have done the same with Oury grips on two of my bikes that have bar end shifters or brake levers.
There's no reason to use anything heavier than oil to lubricate freewheel or freehub pawls*. They and their bearings do not need grease because they are only moving when they have no load on them. When loaded, they are static. Thus it is in their interest to move as freely as possible.
The Morningstar grease injector served only to destroy freewheels. Grease, as VO rightly says, will often cause the pawls not to spring up and do their job. The only exception to this is when the hub bearings and freehub pawls share the same lubricated space, such as in Campagnolo's loose-ball hubs. In such cases, the best grease to use is one that is less thick than standard waterproof bearing grease. Hubs such as VO's have a cartridge hub bearing which carries its own grease behind a shield. It does not share lube with its ratchet.
Light machine oil is best for freewheels and pawls' function, but heavier oils like Phil's will make them run quieter. Anything thicker than that can compromise their function.
*Ring drive freehubs (King, DT etc.) do use grease. But they are completely different types of ratcheting mechanisms.
Over two years later.... Walking Dead fan are you?
The Morningstar Grease Injector was for freeHUBS not freeWHEELS.
I'm not going to debate the efficacy of the Injector, largely because I never got my hands on one and honestly the PITA factor is much lower if you just replace the cartridge.
BTW Shimano freehub driver cartridges are greased from the factory.
Post a Comment