27 October, 2020

Polyvalent Low Kicker and More Fall Arrivals at VO

by Kevin


The Polyvalent Low Kicker has landed. After many, many months of design, development, and testing, we are beyond stoked for the arrival of the latest addition to the Velo Orange lineup. The Low Kicker is a major update to our Polyvalent platform that introduces a low-slung top tube for easy riding while retaining a "do-it-all" design ready to tackle everything from paved commuting to gravel touring. 

We will begin to fill pre-orders in the coming days. For those that missed out on the pre-order, the Low Kicker is now available for order direct from our online store.

And the Low Kicker didn't come alone. As the weather cools down and the days grow shorter, a new shipment of Velo Orange essentials has arrived just in time for your fall and winter bike projects. 

Crazy Bars are back in stock in silver and black. We've received no shortage of questions about when more would be in. A close second, however, is the Klunker Bar, and we're not here to disappoint. Klunkers in their noir finish have also been restocked. We've also received more Left Bank handlebars in 22.2 mm and 23.8 mm sizes as well as Granola Bars in silver and black. 

On the topic of handlebar swaps, if you have been looking for an easy way to convert that old threaded fork to use modern threadless designs in a variety of clamp diameters, our Threadless Stem Adapter is also back in stock. 


We've received more fenders in a variety of popular styles and sizes. 650b x 58 mm fenders are back in black in Smooth and Wavy finishes along with 700c x 52 mm Zeppelin Fenders in Noir. 

And the list goes on. More items back in stock: 

We have also received more stock our Comfy Cotton Bar Tape and Colored Brake Cable and Derailleur Cable kits to add a splash of color to that fall/winter bike build. 

If you have been waiting for something in particular and don't see it in stock, we'll have even more arriving within the next month or two, including the brand new Pass Hunter, a new colorway for the Piolet, and more. 

16 October, 2020

Kevin's Gravel Packer Pass Hunter

by Kevin


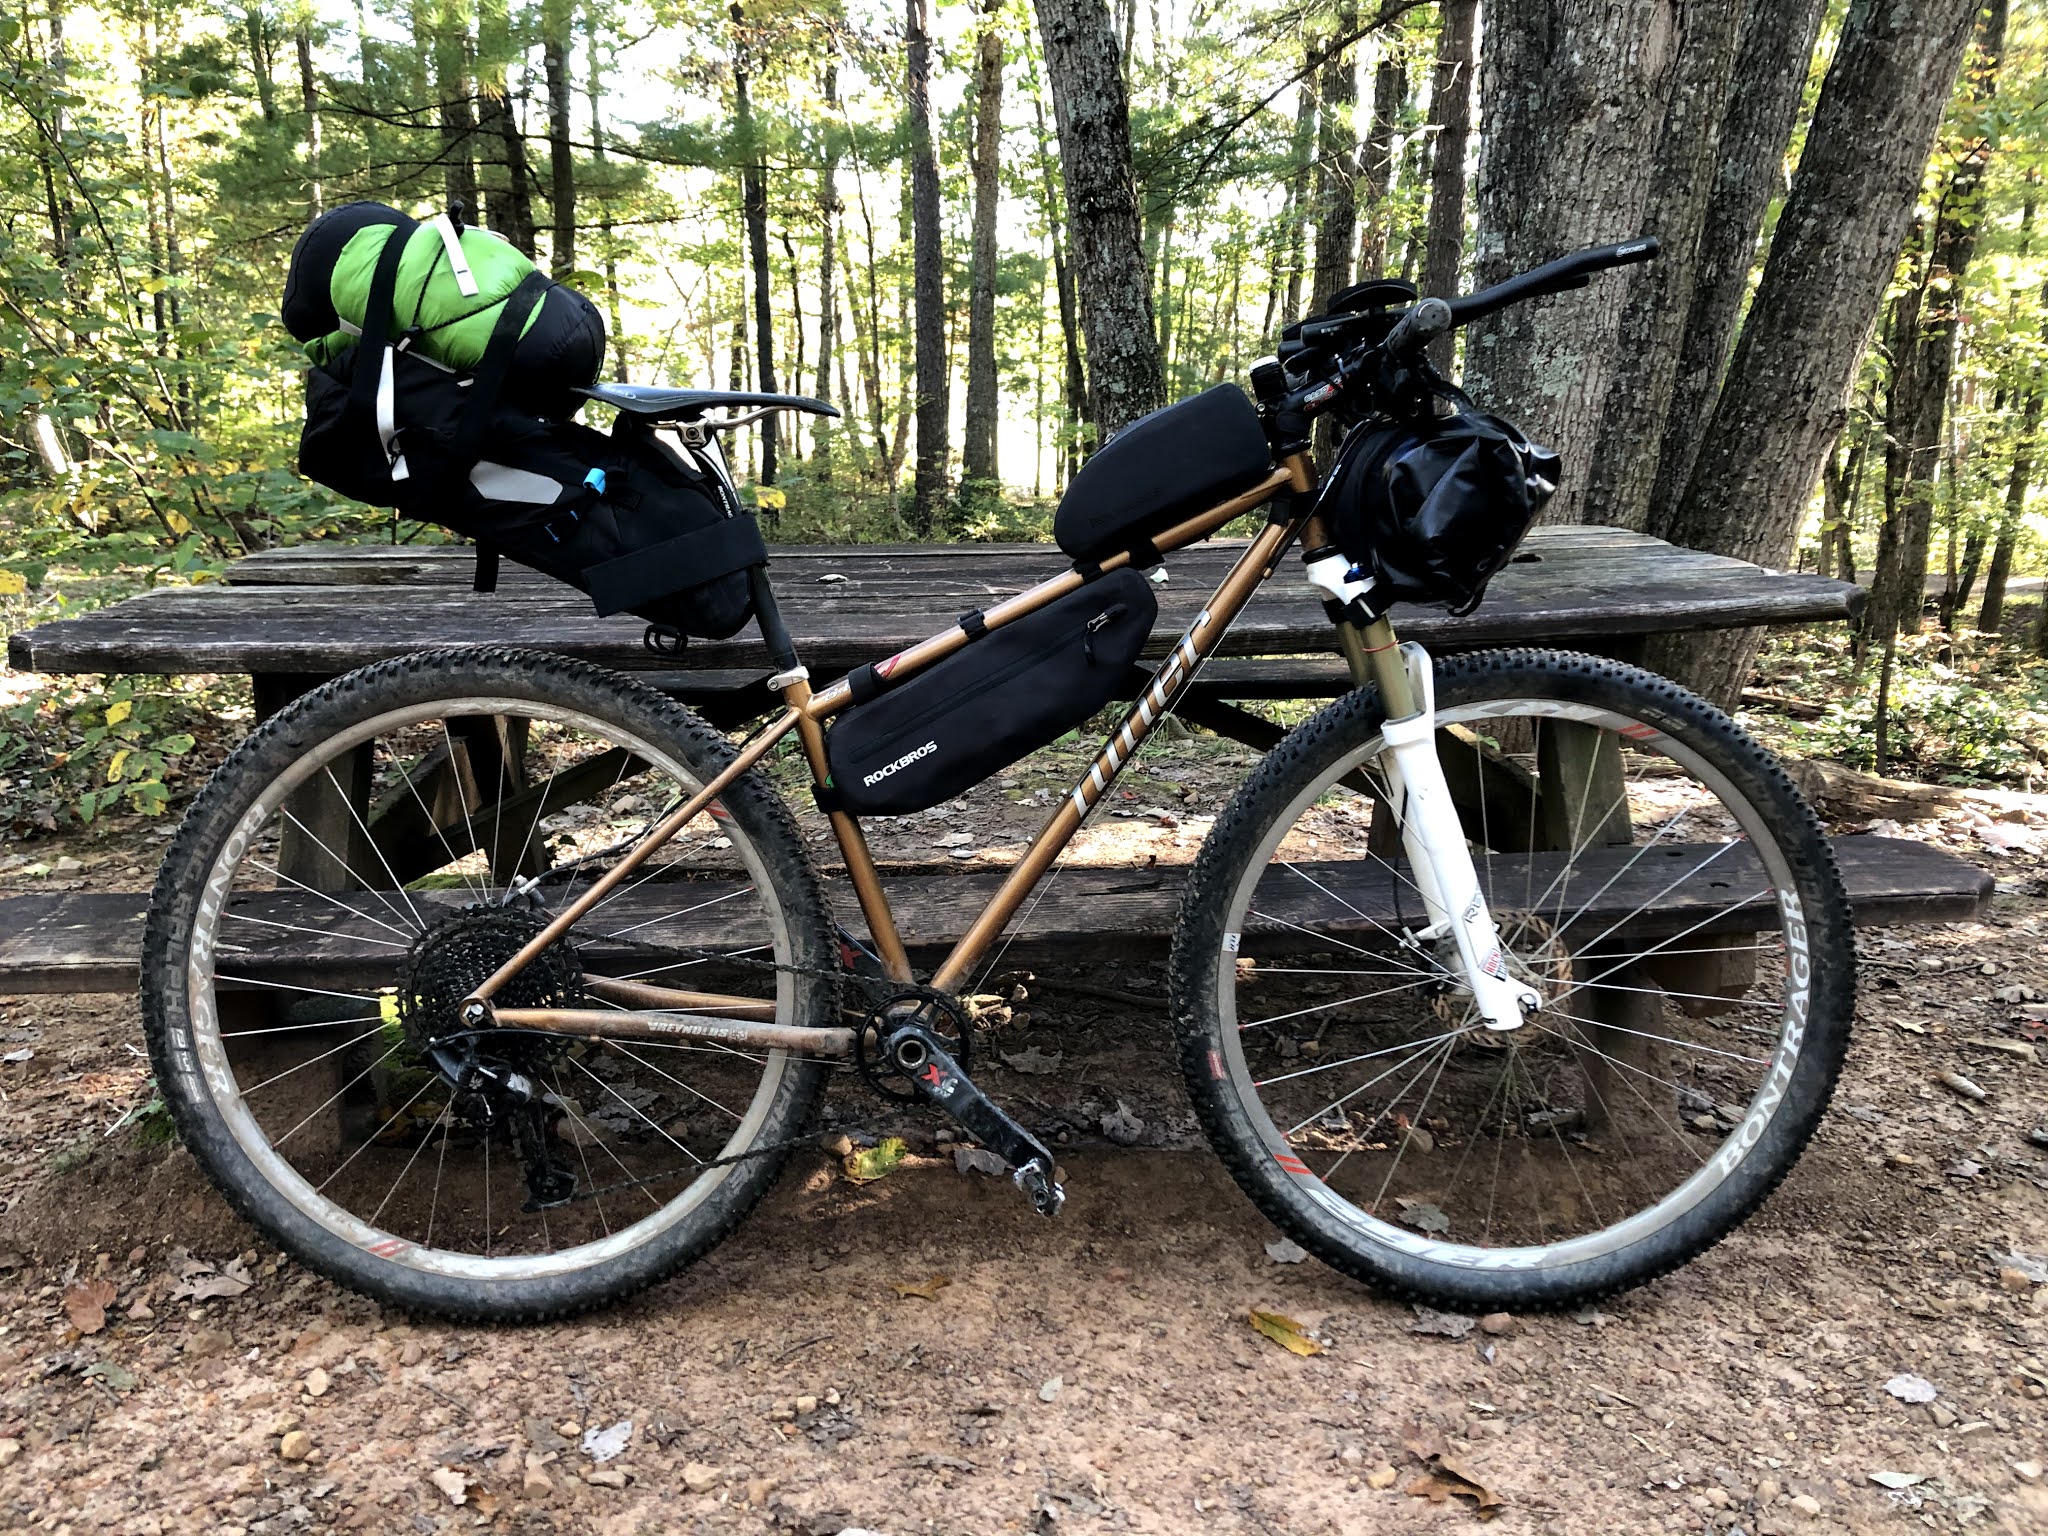
As we near the launch of the new Pass Hunter, we have received a number of questions from customers interested in racks and bags to pair with the frame. We envision the Pass Hunter as an ideal "sport touring" bike, well-suited for a spirited weekend jaunt unencumbered by heavily loaded front and rear panniers. Pushing the concept a bit further, I wanted to see how the frame could perform as a pseudo-bikpacking rig. With a weekend gravel tour as the test, I dreamed up my minimalist gravelpacking (is this a thing or did I just make that up?) setup.


I primarily am a road cyclist, and so my original Pass Hunter build was designed around Shimano's Ultegra R8000 drivetrain and a set of 700c wheels with TRP Spyre brakes. I went with the widest Ultegra cassette offered and paired with our compact Drillium crank. I wanted a build geared for road climbing--this is a Pass Hunter, after all. And that noir Drillium crank just looks sweet, doesn't it? (The crank is on sale now, by the way).


For bars I went with our Nouveau Randonneur drops mounted to our Tall Stack stem. A 0 Setback Seatpost and Brooks C15 saddle round out the cockpit. The Cambium saddles can be a bit divisive, but I've had mine for years and tend to swap it around between my touring setups. Our noir Moderniste bottle cages complete the black and blue look, with a gold seat collar and brass stem cap (a close enough color match) providing a dab of glitz. 


When preparing the bike for gravelpacking, I swapped out the 700c wheels for a set of Shimano GRX 650b wheels. These were ready to go with a set of Teravail Rampart tires (tubeless) in 47 mm. For me, this was a major jump from the 32 mm max I am used to. I've never claimed to be down with the #supplelife, but I have to admit the supple lifers might be onto something. 


For luggage, I wanted to keep things simple and compact. I reached out to our friends at Roadrunner Bags and settled on their Jumbo Jammer handlebar bag and Fred saddle bag. This proved to be just enough space for a three-day tour, with room for my camping gear, a change of clothes, snacks, and some other miscellaneous gear. If needed, a frame bag or some fork-mounted cargo cages could easily expand carrying capacity.


After a weekend in the mountain backcountry (read my ride report here), I at times found the road groupset to be a bit outmatched. A gravel-centric 1x system might ultimately be the only change I'd make for a similar tour in the future. Otherwise, I was quite pleased. I don't see myself going back to a rack and pannier system anytime soon. Check out the complete build list under our Bike Build Ideas page.

14 October, 2020

Sampling the Rockstar Challenge

by Kevin

I first heard of the Rockstar Challenge a couple months back. A fall bicycle tour was in order, and after one too many rides on the C&O Canal Towpath it seemed a new route was called for. My good friend and touring partner Lee Cumberland was finishing prep for the Shenandoah 100 mountain bike race and caught wind of the Rockstar ride from others in that circle. 

A brief history: the Rockstar Challenge began as a trail ride catering to the hardcore mountain biking enthusiasts of the Shenandoah and Roanoke Valleys in western Virginia. It’s part bikepacking route, part all-out race that ties together some of the more challenging MTB trails in the area as it cuts a path from Harrisonburg, once known as Rocktown, to Roanoke, ending at the Mill Mountain Star. Rocktown to the star - Rockstar. You get it. 

The mountain bike trail is notoriously grueling, and in the years since it was first mapped both gravel and road options have been routed. I long ago decided mountain biking wasn’t for me, but I figured it was time I give the gravel life a go. The gravel route sounded like a good opportunity to form a proper opinion on the fad that has swept the industry over the past few years. It was also a great chance to push the capabilities of the new Pass Hunter frameset as a lightly-loaded touring steed. 

I swapped out the 700c wheels and 32 mm tires I had on the Pass Hunter for a set of 650b Shimano GRX wheels with 47 mm tires. I outfitted the bike with a couple of bags from our friends at Roadrunner. I went with the Jumbo Jammer and Fred Saddle Bag, two styles not offered as part of our VO luggage line. I packed in my camping hammock and quilts, a change of clothes, enough food to last a day or so, and water. We also brought a Sawyer filter to pull fresh water from the mountain streams we’d cross. The route does a good job of meeting up with towns and services when possible, but it is largely a backcountry ride with limited access and poor cell phone service. With proper planning of distance and timing, you could probably get away with relying on restock points along the way. 

As a disclaimer, due to time limitations the intention was never to ride the entire route. We cut off the first 50 miles or so by staging at the Stokesville Campground with plans to pick up the gravel route nearby. We’d discover that even the time we had allotted would end up being not quite enough. 

The first day began with about 10 miles of gentle climbing on paved roads in the foothills of the Blue Ridge Mountains before reaching the first gravel road of the day. From there on, it was mostly fire roads and access roads leading to electrical towers. East coast mountains aren’t the towering behemoths of the western US. The climbs tend to be shorter but much steeper. And here the steep climbs on shaky gravel roads became both a physical and mental challenge. The first major climb traversed a bombed-out doubletrack before forking off on an overgrown road following a mountain ridge. The waist-high grass hid the obstacles below, including a large branch that caused my first (and thankfully only) wreck of the trip. With the initial bruises out of the way the next curve ball arrived: a dead-end. 

The route said go forward, but there was nowhere to go but densely overgrown woods. With no desire to backtrack we forged ahead, eventually bushwhacking our way to the yellow blaze marking a singletrack mountain bike trail. So much for the gravel ride. Needless to say, there was more hiking and less biking at this point. The day was already growing long and not much ground had been made up. 

The trail eventually gave way to another gravel road making its way down the mountainside. At the bottom it was time to go up again. Did I mention that this route packs 27,000 feet of climbing into 260 or so miles?  Luckily the trails were a bit more “gravel” than “mountain” from that point on. The rhythm of the ride became apparent at this point as the rest of the day followed a similar pattern of climbing to the ridge, dropping into the valley, and then climbing back out, crisscrossing from the eastern to western faces of the mountainsides. The day ended at the top of one such ridge with camp being set up in the nearest clear patch of woods. We only managed about 40 miles or so of what we had hoped would be at least a 70-mile day. 

The second day of the three-day excursion began with an undulating descent out of the mountains to a brief respite on paved roads. The hope was that a gas station or market would materialize for refueling, but the route continued to find us deeper in the George Washington and Jefferson National Forests, eventually back on gravel and once again climbing up into the mountains (the Sawyer filter was clutch here, allowing us to refill our water bottles from a fresh mountain stream). With supplies dwindling and significantly off-pace to finish the gravel route in three days, we made the decision to jump on the alternate road route around Douthat State Park. This was about 40 miles into the day with a plan to knock out about 40 more before setting up camp. 

At a much needed dinner at the Dairy Queen in Clifton Forge, VA, we set our sights a little off route for a campground with running water, bathrooms, and hot food. We called ahead and learned, much to our delight, that the evening would also feature live music and the undisputed number-one recovery drink: beer. The sun was setting and the destination was perhaps a bit ambitious given the added distance, but a couple more hours winding through the mountains in the dark and we made camp. I can confirm the beer was very good.

The third and final day was mostly easy riding on the road. Switching paths to the shorter paved version of the Rockstar Challenge left us with only about 50 miles to cover to reach Roanoke. It was not without a few challenging climbs as we crossed the mountains one last time before descending into the Roanoke Valley and finding ourselves making quick time to the city. Tired from a few long days on the bike, the last few miles were business-like with a singular mission to cap things off with one or two more cold brews and a good meal (which luckily did not require too many extraneous miles to locate).

We never did make it to the Mill Mountain Star--we stumbled upon a brewery before getting that far. With this abbreviated, alternate routing I can’t say I successfully bested the Rockstar Challenge this time around, but I had a taste and perhaps will tackle it again in the future. Gaining this little bit of familiarity will certainly help for preparations for any next attempt. 

A solid plan and the best intentions do not always make for smooth riding. This is a fact I should have learned by now, but--surprise--I haven’t. I accept that there will always be a certain level of self-inflicted torture involved with bicycle touring. I think most bicycle tourists have a slightly sadistic streak. That or some philosophy about the impact of suffering on character. 


30 September, 2020

Building a Parts Bin Roadie

by Igor

Trek 760 with Velo Orange Components

I picked up this 1984 Trek 760 frameset more than a year back with no particular build idea in sight. It's a very cool frame and fork spec, and in my size! The frame is made from Reynolds 531c (c is for 'competition') tubing and has a 531 fork. It's very lightweight and great for a noodle-bike project.

Original listing picture

I first thought to build it up with all vintage components like Mavic hubs, Simplex shifters, and matching derailleurs. Then I thought to do a 650b conversion. But in order to get the rear tire to fit, I'd have to crimp the rear chainstays. This tubing is pretty thin, so crimping might actually crack the stays. So, that plan went out the window.

The frame sat on my shelf some more until we got final pre-production samples of the new hubs. Tommy from Cutlass Velo built up a wheelset using a 130mm Rear Cassette Hub and a Front Hub, both laced to Enterprise Rims. Now I have a rolling 700c chassis.


Now, the keenest observers might realize that this frame is spaced for 126mm, freewheel hubs. I've done a whole bunch of these 126mm -> 130mm conversions for both myself and customers back in the day. There are two options to make this conversion work: 1) you can cold set the frame to 130mm by expanding the dropouts using some 2x4s and bolts and nuts or 2) simply pull the dropouts open 4mm and shove the hub in. I chose the latter. I've done it this way for years without consequence.

Now what to do about components....

We have some pretty deep parts bins here at VO HQ. Hoarding, QC test mounting, component compatibility, frame handling with drop and flat bars, component testing, etc... stuff that we use mostly to test our frames in the stand and in the real world. And general hoarding. You know the drill.

The handlebars, shifters, and rear derailleur are all from my previous Piolet build. The crankset and bottom bracket is from our test fitting stock. Seatpost is from the hoard. The cassette and chain is used from some other build. The tires are from test fitting. The tubes are patched and put back into commission. The Mini-Rando Bag and Day Tripper bags are prototypes. The headset was included with the frameset purchase. The stem and adaptor is from the hoard. The saddle is a prototype from ages ago. The Moderniste Bottle Cage is a silver one I painted to see what it would look like in Noir. The Sabot Pedals are from our test ride stash. The front brake is a lone Grand Cru brake I found in the brake bin. The rear brake is from my hoard.


So the rear derailleur housing stop is supposed to use a step-down housing cap. At the time we didn't have any in stock. So I found this Problem Solvers Clamp-on cable stop that we used for the very first prototypes of the Piolet way back in in 2015 or so. The bike now has full housing along the chainstay thanks to some perfectly placed zip-ties. Seems fine

I knew I was going to run a bell on the bike and I wanted to make sure it looked as aged as the frame. So sometime in January I found a Brass Temple Bell in the hoard and disassembled it. I scuffed it, lightly hit it with the drill, scratched it, smacked it, dropped it, and then left it outside. I completely forgot about it until I went to build up the bike! It had developed just the right amount of patina while.....aging...... I cleaned it and finished it with a few coats of glossy clear before remounting it on the unused downtube shifter boss. I love the look. 


This build was a bit of a catharsis personally. I can sometimes be really picky about the way my bike looks and how things are oriented. So to just throw all those things that would have bugged me out the window and have two different color tires, brakes with pads all the way up the slots, and a brown saddle with black tape - it felt good. At least the bags match.


I've been riding it for a while now and really like it. It fits me well and is great for the riding I enjoy: not too fast not too slow.

If you want to check out a very complete build list, click here!

28 September, 2020

Keeping the Wheels Spinning - New Hubs and Fall Project Update

by Igor

New Hubs


We received a mountain of new disc and rim brake hubs on Friday. They feature designs we've been working on for a long time and they're finally here! In Polished Silver and Smooth Noir finishes, no less!

The new Rear Disc Hubs are now convertible between 12mm, 142mm Thru-Axle and 135mm QR. This is accomplished using endcaps that don't require any tools to swap. Additionally, these new hubs retain our tool-free cassette removal for maintenance and drive-side spoke repairs.

For the rim brake Rear Hub variant, you can also swap endcaps for 130mm and 135mm. You do need to take a bit more care building this rear hub because the non-drive-side endcap is the one that adds or subtracts 5mm of spacing. So you'll likely need to re-dish the wheel if you move it between 130mm and 135mm spaced frames.


Up front, we have more swap-ability with our Front Disc Hub. It includes endcaps for QR, 12mm (thruaxle), and 15mm (thruaxle) - all 100mm spacing. 


We keep it easy for the rim brake Front Hub. Just QR. 


They all features high-quality sealed cartridge bearings and tool-free dissassembly. Additionally, we are now offering three freehub body options: Shimano 11sp (HG), Campagnolo 11sp, and SRAM XDR. The last one is the Sram spline that allows you to use a 10-tooth cassette - very popular with MTB and touring bikes and allows you to have just that little extra top-end gear range with a 1x drivetrain.

When you buy the rear hub, let us know which Freehub Body Spline you want and we'll make it so. It default ships with Shimano HG, so if you don't put it in the comments or email us otherwise, that'll be what you get.

Medium-ish Bag Re-stock


We also got a bunch of VOxRRB luggage back in stock including:
We also got some extra Shoulder Straps. They are nice, simple, and lightweight and can be mounted on nearly anything that has a loop. So you can use it on non VOxRRB bags, cameras, water bottles, etc...

Projects Worth Noting and Happenings

Polyvalent Low Kickers are aboard the boat and are still planned to reach us by mid/late October. The first run of Small sizes sold out pretty quickly, but we have another small round arriving about a month after.

We're getting Diamond Polyvalents around January. They'll be the exact color and geo as the Low Kicker, but with a horizontal top tube (albeit with a couple degrees of slope). 

More Neutrinos are also planned for January/February. They'll be in the Pistachio Green color and will be dropper post compatible. Everything else is the same. 

More Piolets are slated for delivery around November/December. They'll be the same geo and specifications, and will be wearing a spiffy dark metallic blue paint with reflective VeloORANGE downtube decal.

We're also getting Cargo Bike Fenders for bikes with 26" or 650b rear wheels and 20inch front wheels. Both widths will be 58mm and they'll be made out of stainless steel. We went back and forth about stainless vs aluminum alloy, but settled on stainless. Stainless steel is tougher and more dent resistant than aluminum alloy. It's heavier, but let's be real here. If you're riding a cargo bike, the weight of your fenders shouldn't be a main concern in overall bike weight.

More Crazy Bars will be here in October as well. We sold out of the last production run in under 3 hours. It was not a small amount either. Probably the most we've ever gotten in one go. So the moral of the story is that if you're interested in getting them, sign up for the product alert. You'll get an automated email when they are put back into stock.

We're getting a shipment of parts and accessories in mid/late October. And then another in December or maybe late November depending on the dock timeline. And then another in January, and another in February. Needless to say, this season has been absolutely nuts!

21 September, 2020

Fall Rituals

By Scott

Now that Labor Day has passed, meteorological fall has begun. The pumpkin beers and spiced lattes are in store now or awaiting pick up at your local coffee shop, and even in a year where nothing seems to be familiar, I'm hopeful that fall will be more normal than the past 6 months have been.

I've lived in the mid Atlantic for over 10 years now and one of the wonderful things is that there are truly four seasons here. Fall here is one of the great times of year, with the temps (and humidity) taking a bit of a dive, the colors of the leaves coming out and the chance to wear a sweater outside again!

I find myself having rituals related to the change of the season, especially when it comes to outdoor activities like cycling.  I've always loved the fall Coffeeneuring challenge - you can see previous posts here and here. Over the years, Mary has adapted the rules with help from the large number of riders who have taken part in the challenge. I like the rule that allows riders to use an outdoor spot for the challenge. This year, with social/physical distancing rules in place in most areas, I think a lot more folks will be doing this. We sell a lot of the Soto coffee filter holders, which work great if you're the kind of rider that wants to do coffee outside from scratch.

I also pull out my bikepacking bike this time of year. This year, I've been riding the Pass Hunter Prototype, both on road and on gravel paths of Montgomery County, but with fall's arrival, I might actually get out and camp overnight a bit. I'm not the greatest for camping in the summer here - the heat and humidity are not my friends - so the cooler weather is better for camping out along the C & O or some of the state parks in MD. I don't go to the extreme's that Igor's assessment post has folks go to, but it is a good time to double check the gear and brake cables, the tubes (yep, luddite there) and the chain are all good and ready to go. I don't really worry about tires, as mine are super chunky MTB tires, so a quick check of the side wall to make sure there are no cuts there is about all I do.

For other folks here, it means digging into the closet for that long sleeve jersey or sweater to wear on cold mornings. Igor swaps out footwear for fall riding. He goes from using sneakers or sandals with his Sabot pedals to using boots to keep his feet warm. The result of this is that he has to raise the saddles on his bikes to accommodate the thicker soles, every fall.

The final thing I think of for fall is folks putting fenders back on their bikes. I know it sounds crazy, but in some parts of the world, you can go all summer without rain! I've had a few folks mention in emails  of needing some bits to put their fenders back on their bikes. If you are in this situation, just a reminder that our small fender bits section is here for all your hardware needs.


Anyone else keen for fall's arrival and what sort of rituals surround the changing seasons and cycling in your world? 

31 August, 2020

Trekking Bars - The Original Alt-Bar

*this is a re-publishing of a post from November, 2017. We have updated some links, photos, and dates.

By Scott

It's hard to believe that it has been nearly 7 years since we launched the Crazy Bar. In a world of drop bars and flat bars, the Crazy Bar was polarizing. But, we'd be remiss if we didn't dig back further into the realm of alternative bars to an original one - the Daija Trekking Bar.


Sometimes referred to as Trekking Bars, Butterfly Bars, or Pretzel Bars, I remember seeing these bars on bikes ridden by an older Austrian couple in New Zealand back in 2001. The bars fit well with the front and rear panniers, rack top bags, and trailer they were each pulling around the south island of New Zealand.

Compared to flat bars, Trekking Bars offer more hand positions. You can use the sides to rock up a hill, you can stretch out forwards in a headwind, or keep your hands close to the brakes and shifters.


In terms of set up, there seem to be two camps. You either have the open end of the bars face towards you or away from you. A search of photos on the net shows more people run them with the opening towards the rider, thus keeping the brake levers and shifters close to you. Go ahead, do the Google search, we can wait.

OK, so now that you have seen the myriad of cockpits out there, you can see how this bar is the ultimate in individualizing a handle bar. I've never seen flat bars or drop bars get built up with such a personalized feeling about them. In the photo above, we put tape along the sides, but you could easily use another set of grips there as well for more cushioning.


For those of you who are now intrigued by these, some basic spec's. The clamp area is a 25.4 mm, standard for flat bars. The straight section where your main grips, shifters and brake levers would fit is a 22.2 mm clamp area and is 15 cm long. They work best with a 25.4 mm threadless stem, as trying to get a quill stem around all those curves could prove to be a nightmare. If you had a quill stem with a removable faceplate, that would work as well (wink, wink, nudge, nudge).

( Photo taken by Endlessvelolove )

So how many folks out there are fans of alt bars and how many just want a flat bar with a bit of curve/bend to it?

27 August, 2020

Triples are Great, Change My Mind

By Scott

Recently, I've seen an upward trend in sales of Triple Cranksets here at VO. I've talked to more than a few folks on the phone and online about getting their bike set up with a triple system. It's an interesting trend considering that the wider bike world seems to be moving folks onto 1x systems for road and touring bikes.

Three rings, no waiting

I've been a touring cyclist for all my life (OK, I had one summer when I was a teenager when I tried racing, but we all have that one-time deviation from our true love) and for all of it, I've used a triple. Part of it is related to the fact that I started touring by modifying a mountain bike. I took off the heavy mtb knobby tires and put on slicks or semi slick tires. Threw on a rack or used our early 90's versions of frame bags and seat bags to carry stuff along the Oregon coast, around Tasmania or through the wilds of Sweden. I rode primarily in the middle ring (usually a 34-36 tooth ring) and then when the hills went up, you dropped it down into the inner ring (a tried and true 24 tooth, sometimes made of exotic stainless steel) and when the hill went down, you moved the chain up to the 48 tooth outer ring. You pedaled as long as you could and then you coasted/tucked into an aero position. Simple right?

1x systems came into being in the MTB world - Simplicity they said! No more dropped chains or busted chains from shifting under huge strains! Lighter overall weight! I just don't see it being useful in a touring/city world, in spite of the efforts of the big component companies to promote 1x systems for road/touring use. When it comes to 1x systems, I just see a system that replaces weight on one end - the crank, with more weight in the rear - a huge cassette.

For reference, those huge 12-46 T cassettes weigh 498 gr on my scale. A 12-36 cassette I would run - 408 gr. My triple set up here is 90 grams lighter.

For crank weight, I've grabbed a SRAM 1x drive side arm (with axle attached) which weighs 544 gr. Add on external BB cups at 110 gr for a total of 654 gr.  A VO triple crank (drive side) is 544 gr. Add on a BB to ours and that is an extra 226 gr for a total of 770 gr. The 1x system gets the win here being 116 gr lighter.

If you add on the weight of a left shifter and some cables and housing, yes, my triple set up comes out heavier, but by probably less than 200 gr overall. In a touring or commuting set up, I don't see this as something that would push me one way or the other.

I see 1x systems lacking in the gear range they offer. If we use my VO triple with a 24T inner and a 36T rear cassette cog as my example, it gets me a low gear of 18.2 inches. On the 1x system, the front 42T ring combined with a 46T rear cassette results in a low gear of 24.9 inches. So the old school triple gets you a lower gear, which for most of us, is the number we are truly concerned about while riding. Plus on a more traditional cassette, the gaps between cogs are smaller which makes adjusting for my cadence more natural, rather than the huge gaps in 1x systems.

As to simplicity, I think the product designers/marketing types are over emphasizing how much people shift. I always left the chain in the middle ring, unless I hit a steep uphill or downhill. I was essentially in a 1x system 90% of the time, but with the option to get a bail out at any time. A properly set up front derailleur should be fine in 99% of the situations most of us see ourselves in.

So, chime in. Tell me if I'm a stick in the mud or if you agree that triples (along with 26" wheels, but that is a different blog post) aren't dead yet!