29 September, 2014

French Stems and Installing Grand Cru Reflectors

French Stems
by Clint

Occasionally we get an email requesting we do a run of off sized parts for French bicycles.  Usually there's a pretty good way to work around those obsolete dimensions. I finally decided to swap out the stem on my Peugeot today.  The previous stem was pitting and had a couple gashes in it that would be perfect for crack propagation.  While I was at it, I decided to try out some new bars too.  Of course that would require a new brake lever.

Anyways, the old Atax stem I had in there was a 22.0mm while most conventional threaded stems are 22.2mm.  It's easy enough to take a piece of sandpaper and remove .1mm from the surface.
Signs of wear and tear. 
Purple sandpaper works best. 
The sanding took all of about 15 minutes.  I wish I had thought of this earlier in the process, but if you're trying to be neat about it, tape off the areas you don't want to be sanded.  Nevertheless, the extra abrasions match my frame nicely.  If you're doing this with a steel stem like I did, just be warned that it will be more vulnerable to rust and corrosion without the chrome coating.  Sheldon Brown has some additional words of advice on this and other information on French dimensions.  Overall, I'm pretty happy with the new setup.

Grand Cru Reflectors
by Igor
Adding reflective bits to your bike is one of the simplest and easiest ways to get noticed by traffic. Here's how to mount your new Grand Cru Fender Mounted Reflector.
Presentation is important
The attachment of the reflector to the fender is simple and secure. The included screw threads into the reflector body.
With the bike on the ground, position the reflector where you'd like it to sit. I like it to sit ever so slightly tilted upward to follow the sight line of someone in a car. Too low and or too high and light will not be reflected back. Once you have a good spot, use a punch to prevent the initial drill hole from wandering. Step up the drill bit until the screw fits through.
Put a dab of thread locker or waterproof grease on the threads, tighten, and enjoy!
Do you use reflective materials on your bike? What's your favorite garment to get noticed?

25 September, 2014

Frame Pricing, Shipping, and So On

You may have noticed that our frame prices went up a little recently, by about $20. Yet the delivered cost of the frames is lower because we got rid of the $25 extra shipping charge on frames. Shipping is still not free, but the max you'll pay to have a frame delivered in the continental USA is $19, (unless you live way way out in the sticks and it has to come by bush plane or something.)

We did this to simplify our shipping cost structure and make it easier to understand and transparent. Basically, if you live in the continental USA you get free shipping on orders over $100, except on oversize items (Those are frames and wheels.) which incur a maximum shipping charge of $19.

If you live outside of the lower 48 we charge the actual shipping cost. We ask that you place your order so our incredible shipping staff can weigh it and determine the smallest box it will fit in (because box size is often more important than weight in determining cost). We'll calculate shipping using one or more carriers and send you an e-mail with the charges, usually with different options for speed and cost. You can pick one or cancel the order.
Unlike some companies we don't try to profit from shipping. We don't add some random percentage to the actual shipping charges (though we may round up to the nearest dollar). We don't charge a handling fee. We don't have a restocking fee for returns. And we ship most orders within 24 hours. Our shipping fees on smaller items are based on what the average shipping cost for a package of that value is. In the end it all averages out.

Speaking of frame prices, they'll probably go up next year due to manufacturing cost increases. Our frames are made in the same factory and out of the same tubing and by the same craftsmen as some frames costing more than twice times as much, though, to be fair, you do get more curlicues with some of those. VO frames also cost about the same as some frames that come nowhere near the quality of ours (and it really annoys me when people compare our frames to those). Anyway, it's always been my philosophy to charge what I consider to be a fair profit, not what the market will bear.

Finally, we offer a three year warranty on our frames. Even great steel frames do, very rarely, crack or break, and it's often really hard to tell why it happens. For example, a customer cracked a dropout on a VO frame; we sent him a new frame. He cracked the dropout on the replacement! Those are the only two dropout problems we've seen in the thousands of frames we've sold--and we still have no idea why it happened.

I just wanted to say one more thing about VO frames. I think what makes them special is the way they ride and handle. For me, at least, everything else, except decent build quality, come very far behind ride and handling when it comes to choosing a bike frame. And that's why we're a bit obsessed with ordering multiple prototypes and testing them for many months.

23 September, 2014

Chris's New Bike

My new Camargue set up for road/city use.
My new city/all around bike is a Camargue; it's also my off-pavement touring bike. One of the coolest things about owning Velo Orange is that I can get a new bike whenever I want, yet I rarely want a new one of my own. I prefer to just to borrow a demo bike for a few days. The Camargue fits perfectly with my minimalist tendencies. I can do most anything I want on this one bike: trips around our town with its brick and cobble streets, commuting, paved road exploring in the surrounding countryside, riding down old fire roads and dirt CCC roads to go fly fishing. In fact, if I were forced to only ride a single bike, this would be it.
My new Camargue set up for off-pavement touring.
I'll probably add a rear rack and half clips eventually, but I'm pretty happy with this setup. The panniers are prototypes that still need development work (don't expect them anytime soon). Once fenders are mounted and the stays are cut, it's pretty simple to take them on and off. The bars are 50cm Chris's Rando Bars. (What else would I use?)
Great tires!
Likewise, tires don't take much to change, but I may just get a second set of wheels: minimalism vs laziness. Those Onza Canis tires are amazing and they are an honest 2.25" wide on VO Escapade rims. Road tires are 47mm Continental Comfort Contacts that I'm not sure about yet.
The crank is a VO triple, but a MTB crank might be better if you want to run really wide MTB tires. The rear derailleur and 10-speed bar-end shifters are from Microshift and both seem to work very well indeed. In fact, all the Microshift derailleurs we've tried so far have preformed flawlessly; nice to see a newer company give the big guys some competition.
 I almost used an 8-speed internal gear hub, but this setup is more versatile. How would you set up your own do-it-all Camargue?


19 September, 2014

Measurements for a 1x

by Clint

We've had some questions recently about setting up fixed, single, and other 1x's so I figured I'd shed a little light on the topic in this blog post.

Example setup: 130mm hub bumped up to 135mm with hub spacers.  Spacers and a cassette cog carrier on the freehub.

There are many factors to consider when setting up a 1x anything, but the one that can be particularly tricky is chainline, or getting a straight line from your chainring to whatever kind of gear you are using in the back. It's going to be less important if you're using multiple gears in the back.  In that case, you'll want to shoot vaguely for the middle of the cassette to get the smoothest range of speeds.

Frame Dimensions
If you don't have your hands on a frame already, here are a couple things to keep in mind when finding one to run as a 1x.
  • Rear spacing is going to vary for different frames. 130mm is common for road bikes, 135mm for mountain. 126mm is used on old 6- or 7-speed frames, 120mm on 5-speed.  You may encounter something else depending on the era and purpose of the frame.  
    • Fitting your frame to your hub - If you're using a hub that doesn't match up with the rear of your frame, you can often stretch or squish the frame to make it fit your needs. I can't guarantee this will work, but if you try it, just make sure both sides of the frame are repositioned evenly. Otherwise you'll have to get fancy with your wheel dishing. I'd also discourage you from doing this if you have anything other than a steel frame. The mismatched hub and frame can still work even if you don't permanently set the frame; however, it may take a little longer to get your wheel back in.   
    • Fitting your hub to your frame - Alternatively, if you're bumping up to a larger size from your hub to your frame and don't want to stretch your frame, you can sometimes put spacers in your hub (depending on your hub). I used a couple of spacers in my hub to bump it up from a 130mm to a 135mm. This isn't possible on all hubs.  For instance, our cassette hubs are set up for easy freehub body removal, so spacers would mess things up.  
  • Dropouts - As far as this blog post is concerned, dropouts fall into two categories: 
    • Horizontal dropouts allow for variation in the horizontal distance. I'm including semi-horizontal, forward facing, and rear facing in this category.  These dropouts are going to make adequate chain tension easy since you can adjust it by simply moving your wheel forwards or backwards.
    • Vertical dropouts  - With these, you don't have horizontal variation.  These are good for disc brakes or an aesthetically pleasing fenderline.  If you have vertical dropouts, you have two options:
      • Use a chain tensioner or a rear derailleur if using multiple speeds in the back. These aren't going to work for fixies.  
      • Do the math. Figure out the distance between your gears and use their diameters to calculate the length of the required chain. Make sure this length of chain is either a multiple of 1in if you're using a regular chain or .5in if you're using a half link chain. Next, pray that your chain doesn't stretch too much after a few days of use. Keep in mind that different gear combos can yield the same, if not close, ratio.  Park Tool has an approximation of the formula here.  Helpful hint: CAD programs can do the math for you.  
Calculate the required chain length (red) with these measurements.  

Hub Types
  • For a 1x multiple, just aim to have your chainline somewhere close to the middle of your cassette. Check the top and lowest gears to make sure your chainline isn't too extreme.  
  • For single speeds with a cassette hub, I'd recommend something like the Problem Solvers cassette cog carrier. You'll need some spacers and the threaded end piece of a cassette to line up and keep your cog in place. You can use bottom bracket spacers, spacers from an old cassette, or something else of a similar size.  
  • For fixed or free hubs, you won't be able to adjust cog/freewheel in relation to the hub (see #2 below).  
  • Note: With a spacer, you can use either side of our fixed/free hubs for a cog or freewheel.  Additionally these hubs come with spacers for different frames sizes.  
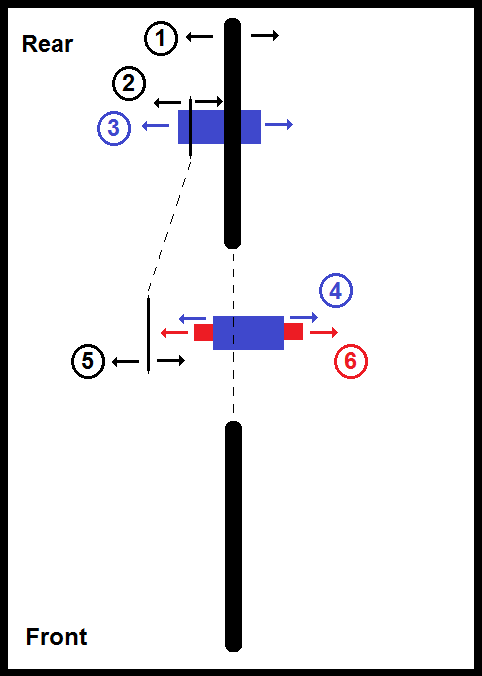
The Big Picture/Diagram


  1. Adjusted with dish.
  2. In a cassette setup, adjusted with spacers. In a fixed/free setup, this can't be adjusted.
  3. Adjusted using spacers or if the hub uses a cup and cone.
  4. Adjusted a little bit in the bottom bracket shell with the use of bottom bracket spacers.
  5. If using a crank intended for multiple chainrings, you can decide which position is best for chainline. Line up 3 with 5. 
  6. With traditional bottom brackets you can change out the spindle or rotate to get a different length. In modern cartridge style bottom brackets, you can experiment with different length spindles.  
In just about any situation with this many variables and unknowns, there's bound to be more that one solution. See what you can come up with.

RIDE FIXED OR whatever.

Clint


16 September, 2014

Travels in Iceland

by Scott

My vacation this year was a long planned trip to Iceland with my wife. Iceland is a place that I have wanted to visit ever since reading the book Arctic Odyssey by Richard Sale and Tony Oliver. We had two and a half weeks, and we planned only to visit the lower southwest part of the country. We didn't have time to try and ride around the island, so we wanted to give ourselves lots of time to explore an area.

I won't bore you with the day-to-day ins and outs of our trip, but I will share some thoughts and photos of an amazing place.

If you are looking for wide open spaces to ride, this is the place. The road above was only a couple of hours from Reykjavik and was our first lunch stop of the trip. While the road was paved here, the hill leading up to it was the first of the gravel/dirt roads we encountered on the trip.
Our first campground was in Grindavik. This was the last stop for many cyclists, as the international Airport and the Blue Lagoon spa were 3 hours and 20 minutes away, respectively. Here we encountered the largest number of cycle tourists, including this French couple traveling with a mountain tandem and trailer. (Most of the tourists we met were from Europe. We didn't meet a lot of North Americans.)
We knew food would be an issue on this trip. Prices are high for goods in Iceland - we knew that going in. We tried to carry at least an extra dinner on us along with some muesli and some cheese and buns for lunch. On one occasion, Melissa came up with the idea for Mexican junk food night: refried beans, cheese sauce and taco sauce all heated up as a layer dip, followed by chips and Icelandic pop to wash it down. Vegetarian, easy to find at the grocery store and very filling.
We camped 9 nights out of 13 on the road. The campsites ranged from wide open fields close to town to the caldera of an extinct volcano in the Westman (or Vestmannaeyjar) Islands.  At the caldera, we had to put the tent up between upright lava rocks and behind mounds of earth. The great thing about the camp sites was the camp kitchens that almost all of them had. An enclosed area with hot plates, tables, electricity and most of all, heat, was very welcome after a long day on the road, or just for the fact that we didn't have to cook bent over a Primus stove in the wind.
Finally, the weather is always something people speak of. We had the full mix of weather: rain, storms, wind and, finally, sun that came out at the best possible times. We went late in the season for cycling in Iceland, and you could tell by the distinct lack of other cyclists by the end of our trip in early September. But even in the worse weather, Iceland had a beauty and an energy that we have not found any where else and we are planning a return trip. It has so much to see and so many different eco-systems and geographic features that I think it can take up a lot of vacations in the years to come.

We flew Iceland Air, and they were great with the bikes. They only charged us $40 per bike, per direction, and they treated our boxes with great care and attention. In fact, everyone in Iceland was very respectful of bikes, giving us lots of room on the roads and always eager to help with suggestions.
For those wondering about gear details, Melissa took a Camargue and I took a prototype frame, the details of which I am sworn to secrecy. We ran 26 x 1.95 WTB all terrain tires which were great for all the roads we encountered. We used a mix of panniers, frame bags and dry bags to carry our "light packing" load.

This was a dream vacation- great riding, lovely food, great beer and wonderful people.


05 September, 2014

More Noir

by Igor

I've been super happy with the progress of our Noir line. If you're keeping score, so far we have an 1 1/8" Sealed Bearing Headset, ChroMo Crazy Bars, ChroMo Seine Bars, Zeste Cantilever Brakes, Long Reach Caliper Brakes, and 0 Setback Seatpost. So today we're introducing a couple new items.


Here's the VO Tall Stack Stem, Noir. Same dimensions and specs as the silver version


We'd also like to introduce Casey's Crazy Bars in Noir. Same dimensions and specs as the original alloy Crazy Bar.

What should be next in the Noir lineup? Drillium? Hubs?


Lastly, we just received a shipment of more Grand Cru Fender Mounted Reflectors. The last shipment sold out very quickly.

02 September, 2014

Using the Six-Pack rack

By Clint

We've had some questions about how to secure your goods.  All you need is a bungee chord and the bag your beverages came with.  Here are a few photos.

Secured and ready to ride
12 oz cans have a lower center of gravity and they're already strapped together.  Not a huge chance of these things falling out, but we still recommend tying them down.

Low gravity beverages
Our friend Eric loaded up his bike with some pear cider, Chilean wine, and Mexican tequila. He's living on the edge securing his six-pack with only a bungee chord; a little risky in our eyes, but it's a darn good looking build.
"Alchoholica" by Eric
We've also been asked what camera bag fits the rack. Igor's been using this Lowepro Rezo 170 AW for a while (which fits perfectly into the Grand Cru Handlebar Bag by the way) because it's simple, lightweight, and comes with a water resistant cover which is tucked into a secret compartment. It's almost like it was destiny.
Remember, there's no use in crying over spilled milk; however, it's perfectly normal to shed tears over broken bottles.