19 March, 2014

NAHBS Photos

by Igor

We just got back from a great NAHBS show. Thanks to everyone who came out and stopped by the booth. It was fun putting faces to names and meeting our dealers who made the trek out.

There was tons of eye candy, but I looked for the details of bikes that were easily overlooked and overshadowed by new bike trends.


Grand Cru brakes on a Cielo.


Beautifully crafted Ellis road bike with NOS 25th anniversary DA

If Batman had a bike


Crazy internally cable routing by Bilenky on a steel TT frame. Yes, that's a baboon.
1st gen PolyV in the wild

Bilenky has a history of making stunning tandems

Paul Brodie's bike. Modeled after an early 1900s style. All components fabricated in-house, down to the brass crankset.

18 March, 2014

VO Job Opening


We have a job opening in our warehouse, just in time for the spring season (if it ever gets here!) Our warehouse is fast paced and deadline driven, servicing retail, wholesale, and distributor customers. Attention to detail and the ability to meet daily shipping deadlines is a must. A background in cycling is strongly preferred.

The main part of the job is packing orders. We'll train you on order and labeling software and the nuances of international shipping. This is primarily a warehouse job, so you must be able to lift 50lb+ overhead onto shelving. But we try to involve everyone here in designing and testing products. So if you're interested you'll have a chance to influence and evaluate our new frames, components, and accessories.

Velo Orange prefers to promote from within the company, so job growth is always possible. Almost everyone here started in this position and moved onto other jobs at VO. Benefits include paid leave and 401k.

For more information, shoot us an email and experience: info@velo-orange.com.

12 March, 2014

NAHBS 2014


This coming weekend is the North American Handmade Bicycle Show, in Charlotte NC. For the first time since 2010, Velo Orange will be there. This is the most attended consumer show (versus industry show) that we'll exhibit at this year. This is also the first time in four years that it's been held on the East Coast; our other exhibiting and travel commitments have kept us away from it since the Richmond, VA show in 2010.

We'll be packing up the contents of our 20' by 10” booth on Thursday (March 13) for the drive southward.
Here's your chance (other than visiting our Annapolis shop) to inspect the full range of VO components, including Casey's Crazy Bars (of course), rim cross sections,  fenders, and our made-in-Baltimore Grand Cru handlebar bag.


Show information can be found here (though our booth, #310, doesn't seem to be on the floorplan - we're right in front of the awards stand). The show Friday-Sunday, March 14-16. Note that exhibitors are not allowed to sell their goods on-site, so you'll have to be content pawing our wares, tastefully arrayed on black and orange backdrops...but you can walk away with a sticker!

We'll be down a few people at the shop during this time, so bear with us if your email doesn't get answered as quickly as usual.

07 March, 2014

Switchable cassettes

by Scott

Here at VO, we run a variety of derailleurs on our bikes. Some of us have run Shimano for years, while others have switched between Shimano and Campy depending on the bike.

One of the great things about our Grand Cru and Hi-Low hubs is that you don't have to commit to one derailleur religion or the other. You have the option of running either Shimano or Campy cassettes on our hubs, since our toolless system allows you to switch out the cassette bodies. The toolless system is also handy when you find yourself at the side of the road replacing a drive-side spoke.


We offer a steel Shimano cassette body and a steel Campy body as options for the Grand Cru and Hi-Low hubs. We also offer an alloy Shimano cassette body as a separate item for folks trying to lose some weight.
The standard steel Shimano body weighs 146 grams while the alloy body weighs 81 grams. The steel one is more durable and best suited if you are running un-spidered cogs, like some custom cassettes and some high end cassettes. The alloy one works only with cassettes that have the full spider on the back of them.

Campy Cassette Body

Aluminum Shimano Cassette Body

You should inspect the pawls (the little springs at the back that engage the freehub body) every six months or so. Take the cassette out, clean out the area, and then re-lube the pawls with some light mineral oil. Don't use grease, as it is too thick and won't allow the pawls to spring properly.


Our freehub bodies work with 7-10 speed cassettes (the 7-speed need a 4.5mm spacer at the back).

03 March, 2014

Closed for Inclement Weather

Once again, road conditions will be keeping our warehouse staff from traveling and the delivery services we count on from picking up and servicing drop off centers. Emails will be answered from an undisclosed remote location (if the federal government can use that line, so can we).


Update: We're re-opened today (March 4), all back to normal.

27 February, 2014

Blue Polyvalent MK3 is Here

The new batch of Polyvalent frames is painted a lovely metallic blue color. We've also added a third set of water bottle bosses and a rear brake cable hanger with adjuster. Here's part of the description from our site:

The Polyvalent is an urban bike that's also capable of being used for cyclo-touring, brevets, and club rides. Polyvalent is French for "general purpose."

The frame is a low-trail French inspired design, much like our old VO Gentleman frame. It's designed for front loads. 

Wheel size is 650b, which we feel is really the best choice for a comfortable ride on bumpy city streets or rough country roads. Maximum tire size with fenders is around 44mm and around 55mm without, but the frame handles best with a tire around 38mm wide. 

The rear dropouts are short horizontal dropouts to allow internal hubs and single speed wheels to be used without the need for a chain tensioner. Longer dropouts would make wheel removal difficult on a fendered bike. Rear spacing is 132.5mm, so both 130mm and 135mm rear hubs fit.

There's more here.

25 February, 2014

Wrapping Handlebars Alex Singer Style, Re-Post

Things are busy at VO. I just got back from Frostbike and am off to Taiwan on Friday, then we're on our way to  NAHBS. So I thought I'd rerun this short blog post from March 2006, rather then writing a new one. This is still my favorite way to wrap bars:
The wrapped bar after Shellacking.
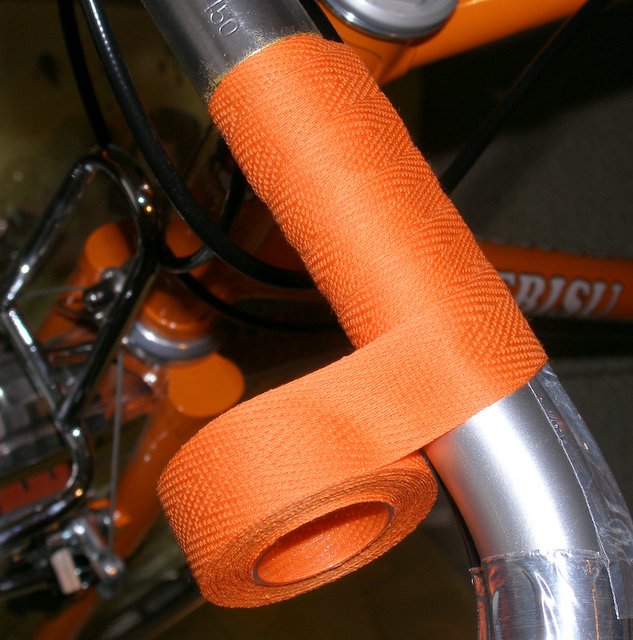
I decided to wrap the handlebars of my new bike in the style I've seen on some Alex Singer bikes. I think his method differs from that used by other constructeurs, for those of you who follow such trivia. Both methods involve starting the wrap at the stem-end of the bar, thus eliminating the electrical tape or twine required to finish a wrap started outboard and leaving a cleaner looking bike. But Singer's method involves wrapping the top half of the bar from the center out, and the bottom half from the end in. "But why is this better and who cares?" you ask. Well, Singer's method not only looks better, but it prevents the rider's hands from 'curling' the tape as he pushes forward on the drops.

If using brifters or aero levers, I like to secure the cables with duct tape (the good metal foil type) rather than with black electrical tape which can show through light-colored cotton tape. The metal duct tape is also used to secure the ends of the cotton tape under the brake lever hoods.

Wrapping bar tape is not easy and it often takes me several tries to get it looking nice and even. It usually takes 3 rolls of tape for any, but very narrow, bars.

Wrapping from the bar's center toward the brake lever. Note the lack of twine
Wrapping from the bar's end toward the brake lever.

20 February, 2014

Frame Saving and Rust

We occasionally get questions about internal rustproofing on steel frames. Should you worry about internal rust on your new, or used, frame? The fact is that the vast majority of steel frames never get any internal rust proofing treatment, yet last for many many decades. On the other hand, you'll occasionally see a rusted out frame, particularly in regions where road salt is used. So to be on the safe side, I rust-proof all my new frames. You'll certainly want to rust-proof any frame as nice as a VO frame.

Back in the day I simply sprayed WD40 into the frame, but today I prefer Frame Saver. Frame Saver is designed to get into the smallest spaces in your bike frame and leave a protective coating when it dries.

A single can will do several frames, and application takes only a few minutes. The included direction are pretty good, but here are a few photos of Scott rust-proofing a Camargue prototype:
First, spray Frame Saver into the main tubes through the BB shell, head tube, and seat tube. Rotate the frame and shoot some more in to better coat the tubes. Next, plug the tubes with rags or paper towels. 
Now shoot Frame saver into all the little vent holes. There should be a vent hole in every small tube; it's there to let out gases while welding the frame. Some cyclists plug these vents with little bits of wax, but I'm not sure if that's a good idea.
Now spin, shake, and gyrate the frame to distribute the Frame Saver and coat the tubes. You need not be quite as aggressive in this as Scott. After a few hours, remove the rags or paper towels and let the excess drain out. Wipe up any that's leaked onto the paint. Repeat with the fork. That's all there is to it.


13 February, 2014

VO Alloy Chainguard Installation Made Easy

by Igor

Our Alloy Chainguard is an easy, affordable way to keep your pants and calf clean from bike grease when using an internal gear hub or single speed/fixed gear.


What you get in the package: one guard with the bottom bracket drive side mount pre-assembled and hardware to mount to the drive side chainstay.


First, untension chain.


Remove crank arms. If you have a VO Crankset, you can pull the arms without using a special puller; you only need an 8mm wrench. Start removing the drive side bottom bracket. The non drive side can stay in. Clean shell and threads. 


Put bottom bracket body through chainguard and re-install into bottom bracket shell.


Assemble chainstay clamp and re-install wheel.


The crankarm may touch the guard. Don't be afraid to push the guard to clear the arm. Different cranksets have different tolerances/q-factors. Note, the bottom bracket will be shifted out to the drive side a couple millimeters, but not enough to really notice any difference.


Confirm everything is tight, ride around to make sure frame flex doesn't change tolerances.


Enjoy! Btw, this thing is shiny.