31 March, 2006
Sometimes You Just Need to Hammer
Sometimes you just want to hammer. I mean cyclo-touring is great, but once in a while it feels good to get on a race bike and just go flat out.
I've started training with one of my wife's friends who's preparing for a triathlon, so I got out my racing bike for first time this season. It's a 1989 Bottecchia Record with all Chorus 10-speed stuff (except for theTA Carmina crank). You may remember that Greg Lemond won the '89 Tour de France on a Bottecchia. I love the stiff SPX frame, chrome lugs, and all the overdone decals. My wife says it looks like a pasta box.
Despite the stage race geometry it's a very comfortable bike and it fits me like the proverbial glove. Like most Italian bikes, build quality is only marginal, but boy is the handling dead-spot-on perfection. So despite the fact that I don't often ride it, I doubt I'll ever sell it. There are some more photos here.
Alec got his race bike out too. It's a Gitane with a Simplex 3-speed drivetrain. Photos here.
Today was the first day of the Spring Tour de Murray Hill (that's our neighborhood), so we both rode our race bikes, but I had to stay in 36x25 for the whole stage. I though I had the little guy, but he came around and nipped me at the line; there are no lead-out men in a two-man stage race. So you see who has the yellow jersey.
30 March, 2006
Product Update (UPDATED)
Velo Orange has received quite a few orders for the bell mount spacers; thanks. They should ship no later than the end of next week.
The toe clip leathering kits will also go into production. I've ordered a supply of needles and of waxed thread, but I'm still awaiting additional leather samples. I think the price will be $7. That's not a bad deal; Robert (in the comments to the previous post) said that a pair of leathered Christophe clips went for over $50 on E-Bay recently.
The flashlight mount is also on track. I've made two more pairs in stainless steel and finally nailed down the proper thickness of metal. The plan is to offer them in two standard sizes, one for C-cell flashlights and one for AA-cell lights. They will ship with leather to line the inside that can be applied with one of two thicknesses of double sided exterior grade tape. This will allow them to fit most flashlights.
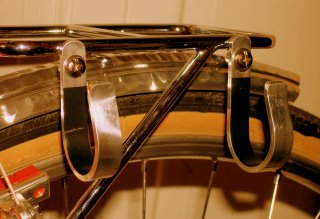
Yesterday I worked on the new Velo Orange decaleur du sac, or handlebar bag mount. The search is on for a welder to make a small production run. My idea is to offer an inexpensive version of this type of rack:
UPDATE: I've found a welder to make the decaleurs and we should have the first one by the end of the week. I hope to have them for sale within 2 to 3 weeks.
The leather toe clips covers will ship by the end of this week. I should say that the leather on the initial batch is a little softer and thinner that on the NOS Christophe toe clips I have. But if it wears out within a year I'll offer a free replacment.
The metal for the first batch of flashlight mounts is also due to arrive this week. Things are hopping at Velo Orange.
28 March, 2006
Toe Clip Leathers
Starting with a small piece of buttery soft upholstery leather, I cut out the appropriatly sized rectangles. Then using a punch that evenly spaces the holes, I perforated the leather. The thread is a special bee's wax-coated traditional sailmaker's thread. And the needle is a blunt tip sailmaker's type.
Sewing on the leather took exactly 10 minutes per pedal by someone who has very little sewing experience - that would be me.
So once again I ask you: could this be a Velo Orange product? I was thinking of a little kit with the pre-cut and pre-perforated leathers, enough waxed thread, instructions, and the sailmaker's needle. Comments? Suggestions? Ideas?
26 March, 2006
Flashlight Bracket
My prototype is fitted to the front rack of my new Ebisu, but by using P-clamps it will fit any front rack. The bolt holes are slotted so the up/down angle is adjustable.
The photo shows a 3-watt LED flashlight that costs under $40 and is so bright that it hurts to look into it. I'm not sure what the battery life is, but it's pretty long. With rechargeble C-cells it could serve as a main front light or a spare light for a randonneur.
I made the prototype from aluminum bar only because I had some the right size, but I think I'll make the next one from stainless steel. With the thinner stainless version I hope to have the P-clamp bent into the bracket so it's all one piece. I'll make one for the TA rack on my city bike soon.
What do you think? Should this be Velo Orange's second product? Would you buy one? What changes should I make?
24 March, 2006
Ding Ding... (Updated)
One of the characteristics of fine bikes is a lack of stuff clamped on all over. There are brazed-on fittings for everything required.
I often take a busy bike path out of town on my rides. So I decided to mount a bell on my new bike to warn pedestrians and slower riders. Of course, I chose one of those lovely Japanese brass bells. But how to mount one without a clamp? The French constructeurs tapped the bike's stem and screwed in the bell. I wasn't willing to do that to my Nitto Pearl stem.
My solution was to tap a headset spacer. I also added a small brass washer under the bell, all very elegant.
Perhaps this will be Velo-Orange's first commercial product. Would you buy one? Please e-mail or leave a comment if you want one or have any suggestions.
UPDATE
Since a few folks have asked to buy a spacer bell mount, I've decided to make a small run of them. I'll need to make a jig to ensure that the hole is centered, so they should ship within two weeks. The kit includes a 10mm tall spacer for either a 1" or 1-1/8" fork, two of the special brass washers, and instructions (not that there's much to it).
The brass bells are available at RBW and Jitensha Studio for under $10; I'll try to get some bells for stock. The first batch will cost $5 each. Shipping is $2 for any quantity. Let me know if the price sound reasonable; I'm new at this. I thought that a bell plus mount would be under $15, which is what cheap aluminum and plastic clamp-on bells cost at my local bike shop. Is this how GM got started?
22 March, 2006
A New Ebisu!
Ebisu (恵比須, 恵比寿, 夷, 戎) is the "LaughingGod" in Japanese mythology. He is the God of fishermen, workingmen, and of good luck.
Here are the build specs. There are more photos here.
- Crank - Specialized triple 46, 34, 26
- Brifters - Campy Centaur 9-speed
- Rear derailleur - Campy Chorus long cage
- Front dreailleur - Campy Euclid
- Hubs- Shimano XT
- Rims - Sun CR18
- Tires - Pasela 32mm
- Seatpost - Ritchey/Nitto
- Saddle - Brooks Pro (may change to an Ideale 90)
- Stem - Nitto Pearl
- Bars - Nitto 115/45
- Headset- Ritchey WSC
- Front rack - custom
- Brakes - old Dia Compe (not sure of model)
- Pedals- MKS Cube (a great pedal)
- Fenders - Honjo hammered 43mm
- Water bottle cages - Delta stainless steel
- Size - 60cm c-c, 61.5cm c-t, 59.5cm tt
Applying Shellac
Tools:
I've spent countless hours varnishing wooden boats, and one thing I've learned is that it pays to have a good brush. Good brushes hold more shellac and so don't need to be 'dipped' as often. They leave a smoother finish, and they last almost forever. Now I don't suggest you buy a $50 varnishing brush, but a decent quality bristle brush is worth the investment. I use a semi-disposible brush called "The Fooler" that's popular in the marine trades. It's made in Indonesia from pure bristle, has a proper wooden handle and costs around $2.
In addition to a brush, you'll need a bit of masking tape and some alcohol to wipe up any spills and clean your brush.
Preparation:
If you use aero brake levers or brifters, secure the cables to the bars with electrical tape or metal foil tape. I like the foil-type duct tape because it doesn't show through cotton handlebar tape. Tape your bars and put a wrap of masking tape (or any type of tape) around the center section of the bar to keep shellac off. Spread a drop cloth under your bike, or roll it outside. I don't bother to mask-off the bike because any shellac I drip on it can easly be wiped off with a paper towel dipped in alcohol. Mix your shellac according to the instructions and off you go.
Application:
I pour as much shellac as I think I'll need into a paper cup or old jar; that's about 7 or 8 ounces for 6 or 7 coats. If any is left over after the job is finished it will be discarded, not poured back into the original container. This ensures that the original shellac is not contaminated.
The first coat of shellac will fill the weave of the cloth and use up as much shellac as several susequent coats. Brush it on as evenly as possible and don't leave any dry spots. I like to wait at least a couple of hours after the first coat to allow this first thick layer to dry. The longer the better. The next coat will darken the tape and be easier to apply. It will also dry in less time. You can keep adding coats as soon as the previous one has dryed until you achive the desired color and texture. In between coats I wrap my brush in Saran wrap to keep it from drying out rather that washing it.
Wrapping Handlebars Alex Singer Style
If using brifters or aero levers, I like to secure the cables with duct tape (the good metal foil type) rather than with black electrical tape which can show through light-colored cotton tape. The metal duct tape is also used to secure the ends of the cotton tape under the brake lever hoods.
Wrapping bar tape is not easy and it often takes me several tries to get it looking nice and even. It usually takes 3 rolls of tape for any, but very narrow, bars.
Wrapping from the center toward the brake lever. Note the lack of twine ;<)
Wrapping from the bar's end toward the brake lever.
Shellac Basics
Yes, shellac is a natural material. It is the crusty secretion of the lac beetle (Coccus lacca) that lives in the forests of Assam and Thailand. It is a natural polymer that when dissolved in alcohol makes a varnish like coating sometimes called "French polish". Though I've never eaten any, I understand it's edible, however, denatured alcohol is not. You could dissolve it instead in good natured (grain) alcohol.
Shellac may be bought pre-mixed at most hardware stores in clear and amber tint. But it is better to mix your own from dry flakes that come in clear, amber, and garnet shades. Shellac should be fresh. Old shellac may not dry, will not be as clear, and may not be as water resistant as fresh. It must also be free of contaminents such as water. It is better to mix a small quantity of flakes with denatured alcohol as needed, rather than rely on a pre-mixed can that might be old. And since pre-mixed shellac is often available locally only in quart cans, the average rider will never use up even half a can before it gets old.
Shellac will add its tint to cloth tape. I like to experiment to find the best color tape and shellac for a particular bike. By the way there are several brands of cotton handlebar tape: Velox, Cateye, Tressostar, Viva. All are suitable for shellacing.
This photo shows the three colors of cloth tape I'm considering for my new bike.
Here they are with a coat of shellac.
21 March, 2006
The Tour de Shwag
A most memorable moment was watching a 5-year old wrestle a French grandmother over a t-shirt. It can get nasty. But after two stages we had 15 or 20 key chains, several posters, newspapers and magazines, dozens of bags of candy and other treats, 4 sausages (the official sausages of the TdF), two mussettes, numerous bike caps and sun hats, one non-alcoholic beer, and an old woman's bra. We saw some bike racers, too.
Follow the link for more photos.
Town Bikes
The TA Handlebar Bag
I think I'm turning Japanese
The Japanese love of nature and great appreciation of art and style translates into their bikes and their riding. So here are a few links to my favorite Japanese bike sites:
http://www.asahi-net.or.jp/~uc6y-ssk/700c_album.html
http://www5e.biglobe.ne.jp/~akuta/
http://velo.way-nifty.com/velo/
http://www5e.biglobe.ne.jp/~yanchari/
http://maryth.cocolog-nifty.com/yasuku_/
http://www.alps-cycle.co.jp/frame1.html
http://www.remus.dti.ne.jp/~suzukita/bicycle/my/my.html
http://www.cs-hirose.com/index.html
http://www.generalworks.com/toeisha/photogallery_eg.html
http://members.jcom.home.ne.jp/my_bianchi/index.html
http://www.eonet.ne.jp/~isb/
http://www.popdan.com/hmbs05/?builder=toei
http://www.kalavinka-bikes.com/index_j.htm
http://blog.livedoor.jp/grandbois1/
http://www5e.biglobe.ne.jp/~akuta/toei%20album.html
http://www.geocities.jp/jitensha_tougeoyaji/
http://www.cs-cherubim.com/
20 March, 2006
"Ride Bikes Outside?"
Interestingly, Alec was in no hurry to give up his training wheels. At the age of four he knew the names of many of the riders in the Tour de France. While watching that great race with his Mom, another avid fan, he witnessed a spectacular pileup. "That wouldn't have happened if they'd had training wheels." he declared.
One of the first almost complete sentences Alec spoke was "Ride bikes outside?"
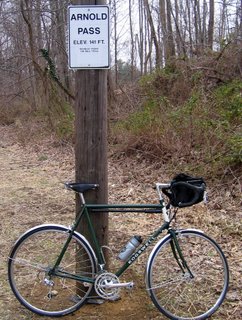
Pass Hunting
I think I'll head over to theShenandoah Mountains in a few weeks and try a pass or two.
Here are some links related to pass hunting:
I The Governing body: http://www.centcols.org/ The rules in English: http://www.centcols.org/regle_du_jeu/rules_of_the_game.htm Other sites and photos: http://www.asahi-net.or.jp/~uc6y-ssk/mypasshunting_00.html http://www.geocities.jp/jitensha_tougeoyaji/tougecollection.htm http://www.rsf.org.uk/ In Japan there are several models of bikes made specifically for pass hunting. Usually they are like lower geared randonneur bikes, but some have flat bars. http://www3.ocn.ne.jp/~tima/others/passhunt.html http://members.aol.com/satorumas/mybike/passhunt.html http://www5e.biglobe.ne.jp/~akuta/pass-hunter.html
A French Rest Stop
The French take eating and cycling seriously. At most highway rest stops you can get a full hot meal with dessert and wine. This is true in much of Europe. I've stopped at Italian rest stops that had better food than most of our local restaurants and a better cheese section in the mini-mart than most American supermarkets.
We were driving from the Basque region to Provence when we came upon this rest stop with a monument and outdoor museum to cycling. With the Pyrenees visible just to the south, it is the perfect place to appreciate the climbs of the great tours.
Welcome to Velo Orange
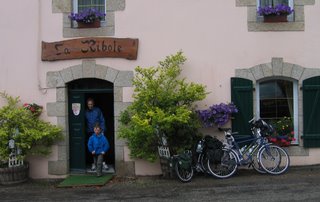
The photo below is of my wife, Annette, with Alec on a tour in France. It had been cold and rainy and uphill most of the day. Alec stoked the trailer-bike and we made it to the half-ruined monastery that was to be our hotel by mid afternoon. The sign on the door said “we’ll open at 18:00.” They are troopers.
So the Velo Orange blog will be about bicycles, cyclo-touring, with maybe a bit of politics thrown in. Eventually, I hope to develop a site to sell some odds and ends that will be of value to the cyclo-tourist and Randonneur.
Oh yes, my bike is orange.