28 January, 2016

VO Blog Posts from 2006

This is our 1150th blog post. There's a lot fun information, and a lot of useless stuff too, in all those old posts. I was just reading some from the first couple of years and thought you might get a kick of them. Here are a few links to fun posts from 2006, our first year. In March VO will be 10 years old.

ATAX Internally Expanding Seat Post, This seat post works like a stem.

Cities for Bikes, and for People, I enjoyed writing this post about car-free towns.

Velo Retro, This post is about a cool company where I've bought some reproduction classic bike catalogs and t-shirts

The Simplex Super LJ Derailleur, the best derailleur ever?

The Mysterious Death of Ottavio Bottecchia, great story.

What about NERVAR? The cool French manufacturer you may have forgotten about.

25 January, 2016

Snow Bikes

by Igor
The East Coast under a blanket of snow and a sheet of ice, so I've stocked up on coffee for coffee-outside-inside (think igloo), firewood, and freshly rolled Ilford Pan F 50.
In addition, I've re-arranged the Piolet for trail riding and snow duty. Riser bars and big tires make it look like a BMX bike on HGH.
Clint re-arranged his Travelers Check with snow duty in mind as well. Flat bars mountain bars, clipless pedals, singlespeed, and knobby tires.
Both machines will fair well in the snow using different techniques. The Piolet with 12psi 3.0" tires with lots of floatation stay on top of the snow, while the TC with 35mm knobbies cuts through the snow to reach the terrain underneath.

What makes a good all-weather bike for you?

Yes, We're Packing Orders, but...

by Annette

...neither Fedex nor Postal Service is picking them up, due to road conditions after the storm. We expect they'll be back to full service tomorrow (Tuesday).

22 January, 2016

Downtubes are the Shift

by Igor

"They're like grandpa's shifters!"
If you simplify what a shifter does to its absolute bare bones, it purely creates and releases tension on a cable which pulls a derailleur cage. With friction downtube shifters, you have to know where each gear is in the shift lever's throw. Too far in either direction can lead to a noisy drivetrain, but don't stop trying! Practice is key and you will learn derailleur and lever positions to keep your bike quiet and happy.
Downtube shifters are still popular with cyclotourists because of their simplicity and compatibility. Break a cable on tour? Throw out the old one, put a new one in. Break a cable in an integrated shifter/brake lever (brifter) on tour? Break out the pliers and magnet because you're going steel head fishing. Not #bikefishing, but #aaahhhhhhhF***thisbikefishing.
Friction shifters work all of the time and are compatible with pretty much every derailleur and cassette available. Want to mix Suntour and Campagnolo? Awesome. Shimano and Simplex? Done. Shimano, Campagnolo, Simplex, Suntour, and Microshift are pretty much all cross compatible with friction shifters.
In addition, downtube shifters are excellent for travel. Packing up your bike for a tour is significantly easier than brifters and bar-ends since there are fewer cables and housing lengths to worry about while positioning the handlebars.
Scott's rando setup on his Gunnar reminds me of Lance from his USPS days. One downtube shifter and one shifter on the bars. Having a right shifter on the bar-end makes it easier to reach the shifter which is used most often.
More recently, mid-80s on, indexed downtube shifters have made sprints and climbs significantly easier. Indexed shifting means that there is a *click* in the shifter for each gear selected. You can throw the shifter around and you'll hit a gear without worrying about being stuck between them. Most Shimano shifters and Microshift bar-ends even have a friction mode in cases where the derailleur hanger is bent or indexing isn't functioning properly. Keep in mind, you need to stay within component families (Shimano with Shimano/Microshift, Campagnolo with Campagnolo, etc...) for proper indexed shifting.
Plus, downtube shifters just look damn good.

Do you still use downtube shifters or am I just stuck in the Paleozoic era?

20 January, 2016

Snow Day Projects

By Scott, our winter expert

As VO's resident Canadian, I was requested to talk a little about winter projects. So with a blizzard approaching the mid-Atlantic ( 'Mericans call it a blizzard. I call it "heavy snow flurries"), I thought now was a good time to go over some ideas of ways to stay connected with the bike, considering the only riding I'll do this weekend is either on the trainer or on my Piolet.

Snow days give me a chance to look the bike over fully to make sure all is ready for the upcoming touring season. And with my increased gravel riding last year and  plans for more gravel touring, it makes sense to ensure everything is ready to go and make the most of spring when it arrives.

The first thing I do with my winter break is to give my leather saddle some care and attention. Rubbing in some of the VO saddle care helps protect the leather. If you just bought a VO saddle, keep in mind that our saddles come with a waterproof spray applied to their tops; the waterproofing helps protect the saddle during the shipping from Taiwan. It takes about a month of riding for the treatment to wear this off, so don't bother applying the VO leather care until you've ridden it for a month or so.

After the saddle has some wear on it, you can apply a dab of the saddle care to a nice clean rag and rub it into the leather. You don't need to use a lot of it; a little dab will do you, as they say. You can also use the saddle care on boots or such. It is made by Limmer boots for us, and we've all used it on leather boots for ages to keep them in tip top shape. There's more about VO saddle care in this older blog post.


Moving down the bike, there are lots of bits on my bike that are, well, shiny. So this is where Simichrome comes into its own. You can use it on a ton of stuff. I've used it on fenders, crank arms, stems and my Opinel knife to get them all looking nice and clean and shiny. It's also great for restoring classic parts as Chris explains here.

Next, I check over the brake pads and make sure they have enough life left on them and replace, if necessary.

I also take the down time to go over some of my camping stuff that has been in storage for the last couple months, clean it up, and check that everything is ready to go for future adventures. I give all my camp knives a sharpening with the Opinel shaprening stone. I also give everything else like mugs, sporks and bowls a good wash and dry and put them back in their stuff sacks, so they can be grabbed quickly and with the knowledge that they are ready to go.

Other then watching cycling movies on Netflix, what are your snow day projects?


13 January, 2016

Camargue Eats Cobbles

by Igor
Annapolis is an old city. Not 12th century European old, but it's still old by American standards.
Back in the 17th century, they couldn't have anticipated 2 ton rectangles with four wheels and small explosions emanating from in front of the driver while barreling up Main St and spewing hydrocarbons.
Bonus points if you know what street this is. Photo courtesy of the MD Government Archives.
All the transportation around the city was by horse, foot, velocipedes, carriages, and wagons. This is why the streets are very narrow and cobbled. The Hysterical (Historic) Preservation Commission ensures that they stay old. So.....they need some work.
Someone with a BMX needs to hit this jump


Today's Main St.
Freezing and thawing of water in addition to automobile traffic doesn't help the condition of the streets, either.
The tire clearance on the Camargue makes it an excellent candidate for an all-round bike that tackles the road and trail. The tires fitted on this build are the 700cx47mm Continental Comfort Contact. The bike swallows up vibrations and impacts with ease.
We're paring down bikes in our showroom, so this tour-ready machine is for sale! SOLD!

08 January, 2016

Drops on Chris's Piolet

by Clint
Chris's Piolet.
Winter is a good time to experiment with new builds for the upcoming season. Chris wanted to test out some drop bars on his personal Piolet. One thing led to another and we ended up changing out the entire drivetrain.  
10-speed hydraulic brifters.
Daija Short & Shallow Drops.
New crank for the 2x10.
Longcage Sram Gx, compatible with the brifters and a big cassette.
Hydraulic caliper behind a big cassette.  
Aggressive Ardents.
The new getup starts with the Sram S700 2x10 hydraulic levers. We went with a long-cage 10-speed Gx rear derailleur for a huge range in the back. It's a solid derailleur for the price, and it's compatible with their 10-speed road line.

In the front, we have a X7 double crank and a matching derailleur...should be a good range for any hills around here. To finish it off, I added a couple Jagwire barrel adjusters. Sram derailleurs usually have the adjusters for the road line, and Sram trigger shifters usually have the adjusters for the mountain line. Since we're using a combination, we had to throw in adjusters elsewhere.

It had been a little while since I've played around with hydraulic stuff, but I've now set up both Shimano and Sram hydraulic brifters. The Shimano kit comes with the levers, brakes, brake hoses, and fluid along with some fittings and basic tools. None of the brake parts is connected or bled. The Sram kit comes pre-bled with long hoses in addition to spare hoses. The Shimano system was simple enough to bleed, and I appreciated the use of mineral oil versus the more hazardous DOT fluid that Sram uses in their system. The front brake in the Sram setup was close enough that I left it as is. I shortened the rear hose carefully, and didn't end up having to bleed it, so that was nice.

Without considering compatibility, and despite the easier setup with the Sram system, I prefer the Shimano levers. The cables have a cleaner routing and were easier to access. The calipers also have a bit more clearance with the spokes.  I could see this being a problem on some other bikes. These are all just initial impressions. Stay tuned for a followup after we get some dirt on this drivetrain!

06 January, 2016

Bike Packing Rack, Blems, and Bells

By Chris
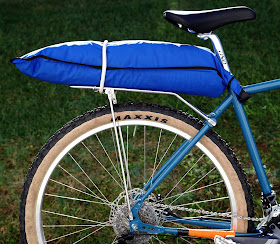
I have to admit that I'm not a fan of some bike packing bags, especially of those ass-rockets that swing and stick out behind the saddle, but then I never liked large saddle bags of any type. So when we were testing the Piolet prototypes I had an idea for a minimalist rear rack to carry a dry bag.
The advantages to this system include the ability to vary the size of the dry bag depending on what you need to carry; dry bags are cheap so you can have several. The load won't sway or bounce around. Unlike panniers the dry bag setup keeps the bike narrow for single-track touring. And dry bags really are dry, in any weather. Should we make these?
The rack above was welded up by one of the staff from 3/8" stainless tubing. In addition to carrying a dry bag, it will take small panniers, which are convenient for grocery shopping and commuting.
We have a few more blemished framed for sale. This is a smart way to save some money. After all any bike will likely have a some blemishes after a few months of riding, so you might as well get ahead of the curve.
Finally, I just wanted to show you this cool hand hammered bell made by frame builder Nao Tomii. They start out as a VO Striker Bell. You can get the hammered version at Nao's site.